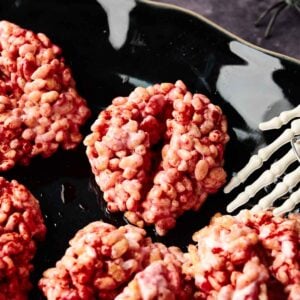
Halloween Rice Krispies Brains
These Halloween Rice Krispies Brains are the kind of treat that makes people laugh, gasp, and then come back for seconds. They’re quick to whip up with just a few ingredients, and you don’t need any special tools to pull them off, as shaping them is easier than it looks. Whether you’re hosting a Halloween party, sending something to school, or bringing them out for costume nights, they’re versatile enough for any spooky celebration. You can even make them ahead so they’re ready to serve when the fun begins.
Equipment
Ingredients
- 4 tablespoons butter
- 2 cups pink and white marshmallows
- 4 cups Rice Krispies cereal
- 1 tablespoon red food coloring
- Red icing for decorating
Instructions
- Line a large tray with nonstick baking paper.
- In a microwave-safe bowl, combine the marshmallows and butter. Heat in 1-minute intervals, stirring between each, until fully melted and smooth.2 cups pink and white marshmallows, 4 tablespoons butter
- Stir in the Rice Krispies and red food coloring until the mixture is evenly coated. This may take a little time, but it will come together.4 cups Rice Krispies cereal, 1 tablespoon red food coloring
- Lightly oil the front and back of two spoons. Scoop and drop mounds of the mixture onto the prepared tray.
- Wearing food-safe gloves brushed with a bit of oil, shape each mound into a rough brain form.
- To create the “brain crease,” lightly oil a table knife and press a line down the center of each mound, adjusting the shape with your oiled fingers as needed. Repeat until you have 10–12 brains.
- Decorate with drizzles or dots of red icing to mimic blood.Red icing
- Let the brains set at room temperature for 4–5 hours before serving.
Video
[adthrive-in-post-video-player video-id="lAYVSFy8" upload-date="2025-10-02T11:00:33+00:00" name="Creepy Rice Krispies Brains Recipe" description="Sweet, sticky Rice Krispies brains that are perfect for parties." player-type="default" override-embed="default"]
Notes
- Line your tray first: Always set up your tray with nonstick baking paper before you start adding anything, so you’re ready to scoop.
- Melt slowly: Heat the marshmallows in short bursts, stirring between each, to keep them from burning or turning rubbery.
- Mix fast: Once the cereal goes in, the mixture starts to set quickly. So, stir right away and continuously to coat everything evenly.
- Oil your tools: You're working with a sticky mixture here, so lightly oil your spoons, gloves, and knife to stop it from clinging. Don't use olive oil or any strong oil, as that can add an aftertaste to this sweet treat. Go with neutral oils like canola instead.
- Shape while warm: Don’t wait too long. Form the brains while the mixture is still pliable, or they’ll be too hard to work with once they're cooled.
- Don’t forget the line at the center: Without it, the mounds just look like lumpy cereal balls, but adding that indent makes them instantly read as brains. It’s the small detail that turns sticky mounds into something creepy and brain-like, so don’t skip it.
- Decorate last: Hold off on the icing until the shapes are done so you don’t smudge the bloody details. Make sure you thin it out as well for the perfect streaks and drips that soak into the crevices of the Rice Krispies brains. Stiff icing won't just give you the same effect.
- Let them sit for several hours: Give the brains 4–5 hours at room temperature so they firm up properly. Skipping or rushing this step leaves them too soft and sticky, which can cause them to lose their shape and make a mess when you try to serve them.
Nutrition
Calories: 87kcalCarbohydrates: 14gProtein: 1gFat: 3gSaturated Fat: 2gPolyunsaturated Fat: 0.2gMonounsaturated Fat: 1gTrans Fat: 0.1gCholesterol: 8mgSodium: 71mgPotassium: 11mgFiber: 0.04gSugar: 6gVitamin A: 590IUVitamin C: 5mgCalcium: 2mgIron: 2mg
Tried this recipe?Let us know how it was!