Loaded S’mores Bark is my go-to every time I crave s’mores but want something shareable for a crowd. Chocolate melts on your tongue while graham crackers add crunch underneath, and those toasted marshmallows on top taste like summer campfires. The chocolate drizzle makes each piece look fancy, and you’ll find yourself breaking off just one more piece over and over.

This post contains affiliate links. As an Amazon Affiliate, if you purchase through those links, I earn a commission. Thank you!
I make it for birthday parties, summer barbecues, Christmas dessert trays, and cookie exchanges because it’s no-bake, feeds a crowd, and captures that nostalgic campfire flavor everyone loves. It’s kid-friendly and works perfectly as a holiday edible gift for teachers and neighbors. The bark stays fresh at room temperature for about 4 days or freezes for up to 2 months.
Ingredients You’ll Need
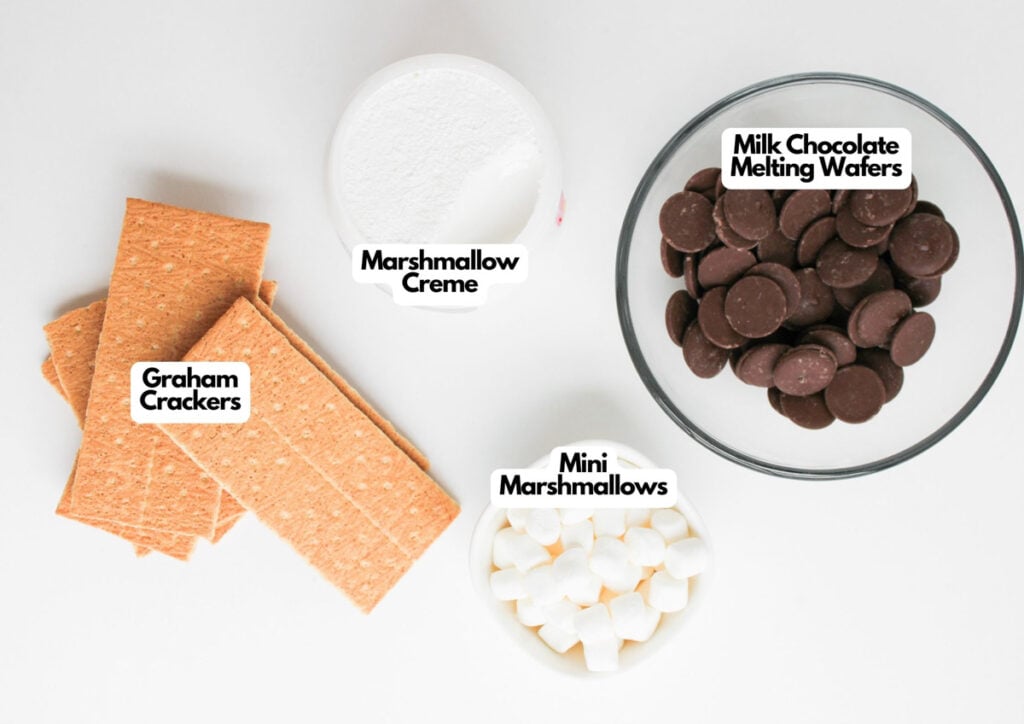
You’ll need all the ingredients shown in the photograph below.
How to Make Loaded S’mores Bark with Step-By-Step Instructions
Scroll down for the full recipe card containing a full printable recipe and measurements in both US customary and metric units.
You’ll have this bark assembled and ready to set in under an hour.
Prepare the Graham Cracker Base
Line a baking sheet with parchment paper or wax paper, then arrange whole graham crackers in a single layer to form a large rectangle. I like using these beeswax wraps because they’re reusable and work perfectly for covering the bark while it sets or wrapping individual pieces for gifts.
Spread marshmallow creme evenly over the crackers using an offset spatula, making sure to get an even layer without tearing the graham crackers underneath. The marshmallow creme acts as the gooey middle, a thin layer that holds everything together.
Melt the Chocolate
In a microwave-safe bowl, heat the chocolate in 30-second intervals, stirring each time, until smooth and fully melted. If you’re using chocolate melting wafers, they’ll melt faster and smoothly than chopped chocolate bars.
SERIOUSLY GOOD
DESSERTS!
Dessert First is a collection of 61 RECIPES to show you that you can make beautiful, impressive desserts right in your own kitchen, no matter your skill level.
Immediate eBook download. No physical book available.
Includes ad-free recipes like:
∙ Lemon Pound Cake
∙ Starbucks Cake Pops
∙ Boston Cream Pie
∙ Chocolate Mousse
∙ Matcha Tiramisu
...and much more!

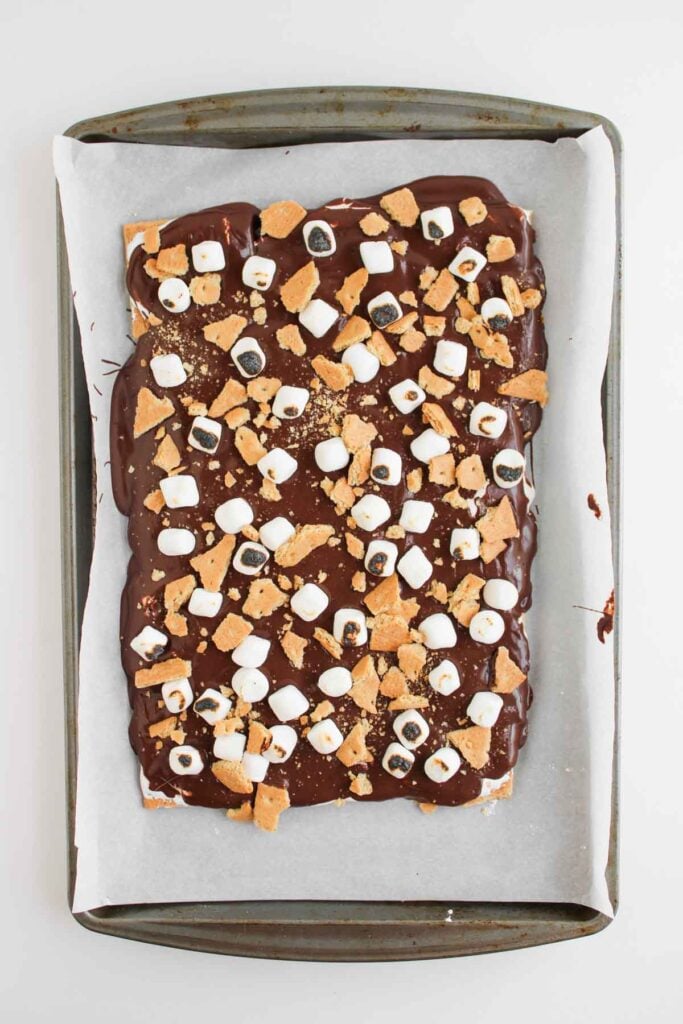
Assemble and Top the Bark
Pour the melted chocolate over the marshmallow layer and spread evenly with your offset spatula. Immediately sprinkle mini marshmallows and crushed graham crackers over the top before the chocolate sets in your tray.
If you want that classic toasted marshmallow look, I use this kitchen torch to lightly toast the mini marshmallows until they’re golden brown. Work quickly because the chocolate will start to firm up within a few minutes.
Set the Bark
Let the bark sit at room temperature in a dry place, so the chocolate hardens completely, or chill it in the refrigerator for about 30 minutes to speed up the process. Once set, you can drizzle extra melted chocolate over the top and sprinkle with flaky salt.
The salt cuts through the sweetness, adding a gourmet touch.
Break Into Pieces
Once fully set, break the bark into irregular pieces by hand or use a sharp knife to cut clean squares. The bark will snap cleanly when fully hardened, giving you rustic, jagged edges that make it look homemade.
Serve
The bark travels really well because the chocolate sets firm at room temperature, and the pieces stay intact. Enjoy!
I pack them in a sheet pan with a lid, separating layers with parchment paper, and they hold up perfectly for potlucks, parties, or gift-giving. This insulated casserole carrier works well for longer trips, as it keeps the temperature stable and prevents the chocolate from melting.

Loaded S’mores Bark
Equipment
Ingredients
- 1 pack graham crackers about 8 sheets, plus extra crushed for topping
- 7 ounces marshmallow creme
- 10 ounces milk chocolate melting wafers or chopped chocolate
- 1 cup mini marshmallows
- Flaky salt for garnish (optional)
Instructions
- Line a baking sheet with parchment paper. Arrange whole graham crackers in a single layer to form a large rectangle. Spread marshmallow creme evenly over the graham crackers.1 pack graham crackers, 7 ounces marshmallow creme
- In a microwave-safe bowl, heat the chocolate in 30-second intervals, stirring each time, until smooth and fully melted.10 ounces milk chocolate melting wafers or chopped chocolate
- Pour the melted chocolate over the marshmallow layer and spread evenly. Immediately sprinkle with mini marshmallows and crushed graham crackers before the chocolate sets. Optional: Use a kitchen torch to lightly toast the mini marshmallows for a classic s’mores look.1 cup mini marshmallows
- Let the bark sit at room temperature or chill in the refrigerator until firm. Drizzle with extra melted chocolate and sprinkle with flaky salt, if using.Flaky salt
- Once fully set, break the bark into pieces and serve or store in an airtight container.
Notes
- Use quality chocolate: Chocolate melting wafers work best because they melt smoothly and set with a glossy finish, but you can use chopped chocolate bars if you prefer a richer flavor.
- Work quickly with toppings: Sprinkle the mini marshmallows and crushed graham crackers immediately after spreading the chocolate because it starts to set within 2-3 minutes, and toppings won’t stick once it firms up.
- Toast marshmallows carefully: If you’re using a kitchen torch, keep it moving constantly and hold it a few inches away from the marshmallows so they toast to a golden color instead of burning black.
- Customize the toppings: Add crushed pretzels, chopped peanut butter cups, or a drizzle of caramel for different flavor variations while keeping the same base recipe.
- Cut or break strategically: Let the bark set completely before breaking it apart, and if you want uniform pieces, score the chocolate lightly with a knife while it’s still soft, then break along those lines once hardened.
- Flash-freeze first: Freeze bark pieces on a baking sheet for 1 hour before transferring to containers so they don’t stick together, and you can grab individual pieces without them clumping.
Nutrition
SERIOUSLY GOOD
DESSERTS!
Dessert First is a collection of 61 RECIPES to show you that you can make beautiful, impressive desserts right in your own kitchen, no matter your skill level.
Immediate eBook download. No physical book available.
Includes ad-free recipes like:
∙ Lemon Pound Cake
∙ Starbucks Cake Pops
∙ Boston Cream Pie
∙ Chocolate Mousse
∙ Matcha Tiramisu
...and much more!
How to Store Leftovers
Store the bark at room temperature in an airtight container for up to 4 days. Keep the pieces separated with parchment paper so the chocolate doesn’t stick, and make sure the container is sealed tight to prevent the graham crackers from getting soft.
If your kitchen is warm, the chocolate might start to soften, so the fridge works better in summer. For longer storage, freeze the bark in a freezer-safe container for up to 2 months. I love using reusable freezer bags because they keep the bark fresh without taking up much freezer space.
Flash-freeze the pieces on a baking sheet first, then transfer them to the container so they don’t stick together. Thaw at room temperature for about 15 minutes before serving, and the bark will taste just as fresh as when you made it.
What to Serve With Loaded S’mores Bark
I usually serve this bark with cold milk, hot chocolate, or coffee since the sweetness pairs well with any drink. It’s perfect on dessert platters at summer barbecues alongside brownies, cookies, and other finger foods that people can grab easily.
You can also crumble the bark over ice cream, use it as a milkshake topping, or pack it in gift boxes with other homemade treats. The pieces travel well to camping trips, pool parties, and outdoor gatherings, and they always get compliments because they look way more complicated than they actually are.
More Easy Dessert Recipes for You to Try at Home
I think you’ll love these other easy dessert recipes, perfect for parties and gift-giving.