Every Halloween, I like to bring something to the table that gets a mix of laughs and wide-eyed reactions before anyone even takes a bite, and these Halloween Rice Krispies Brains do exactly that. They look creepy, but underneath, they’re the kind of soft, chewy, slightly crisp treat people actually want to eat. The trick is all in the way you shape them, and once you know how, it’s surprisingly simple to pull off.

This post contains affiliate links. As an Amazon Affiliate, if you purchase through those links, I earn a commission. Thank you!
I love making these for Halloween gatherings as they always spark conversation the moment people see them. Friends always ask how I got them to look so real, and I love watching their hesitation turn into smiles when they go in for a taste. They’re just as fun for a school Halloween event or costume party. You can make them ahead, keep them covered on the counter, and they’ll still be fresh when it’s time to bring them out.
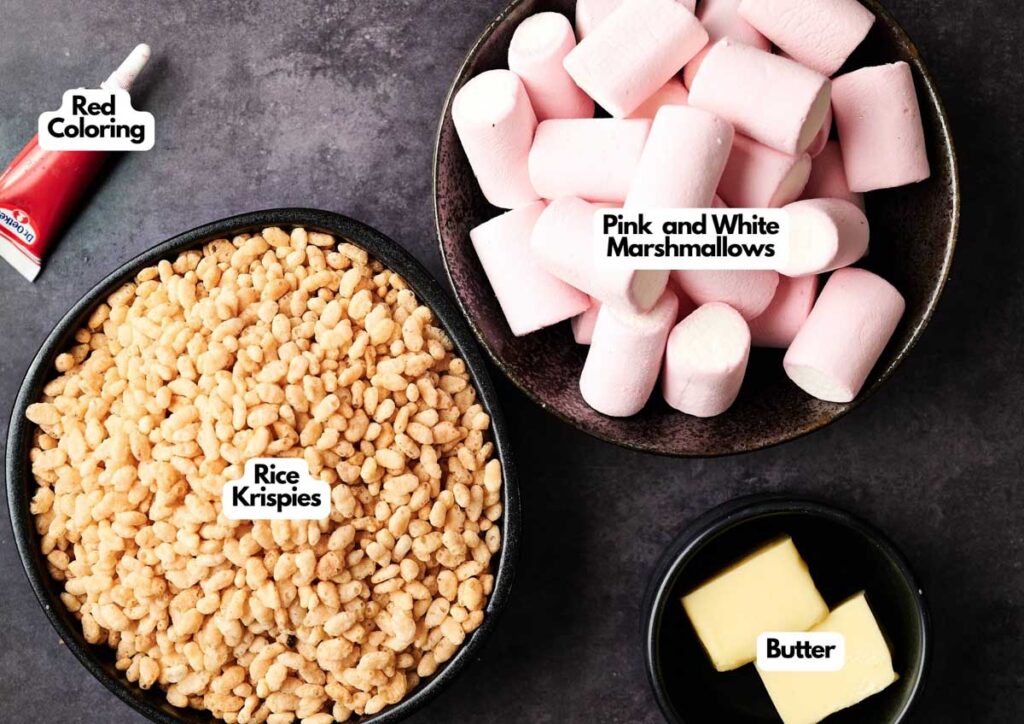
Ingredients You’ll Need
You’ll need all the ingredients shown in the photograph below.
How to Make Halloween Rice Krispies Brains with Step-By-Step Instructions
Scroll down for the full recipe card containing a full printable recipe and measurements in both US customary and metric units.
Stick with my easy steps, and you’ll see how fun these brain rice crispy treats are to make from start to finish.
Melt the Marshmallows and Butter
Place the marshmallows and butter in a microwave-safe bowl. Heat them in 1-minute intervals, stirring between each round to prevent scorching, until everything is smooth and melty.
I use this glass mixing bowl; it’s microwave-safe, stain-resistant, and long-lasting. You could melt the butter and marshmallows in a nonstick pot over medium heat if you prefer the stovetop method.
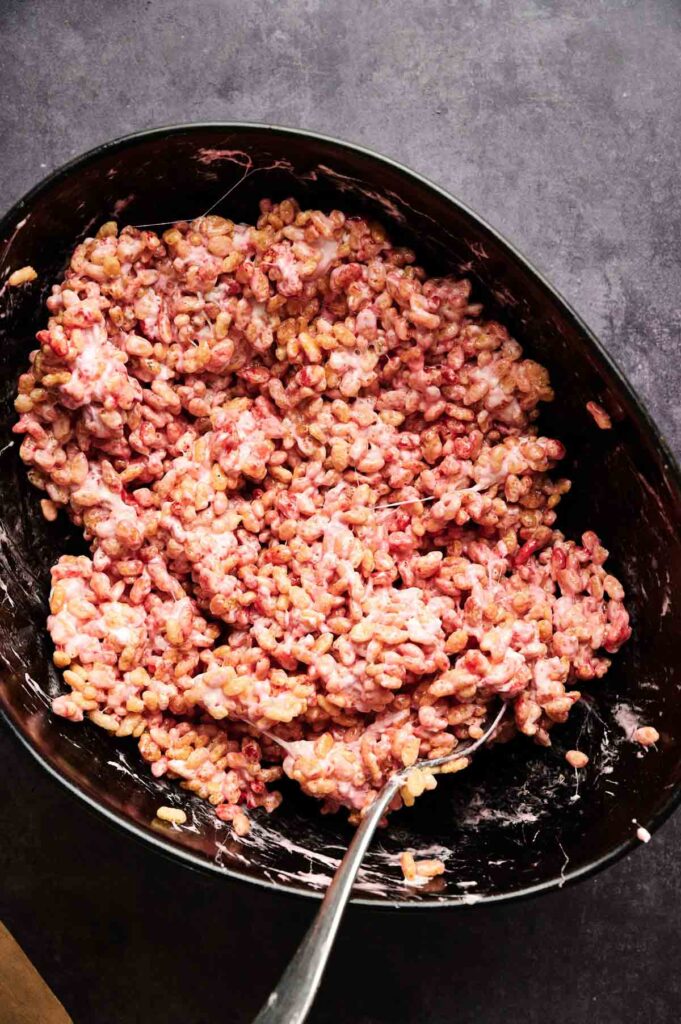
Mix in the Cereal and Coloring
Add the Rice Krispies and drops of red food coloring to the melted marshmallow-butter mix. Keep stirring until every piece of cereal is coated in an eerie red-pink shade. This gives your krispy treats a nice brain color.
It takes a bit of patience to coat everything fully, but give it time and keep going, and it will all come together nicely as it should. A silicone spatula is great for scraping down the sides of the bowl so you don’t waste any of the sticky mixture.
Shape the Mounds
Lightly oil the front and back of two spoons with non-stick spray and use them to scoop the sticky mixture onto a tray lined with non-stick baking paper. This refillable oil spray bottle makes greasing faster. You can also use a cookie scoop instead to get even portions.
Drop them in even mounds so they’re easier to shape. A pre-cut parchment paper like this prevents the sticky mounds from sticking to the tray and makes cleanup easier.
SERIOUSLY GOOD
DESSERTS!
Dessert First is a collection of 61 RECIPES to show you that you can make beautiful, impressive desserts right in your own kitchen, no matter your skill level.
Immediate eBook download. No physical book available.
Includes ad-free recipes like:
∙ Lemon Pound Cake
∙ Starbucks Cake Pops
∙ Boston Cream Pie
∙ Chocolate Mousse
∙ Matcha Tiramisu
...and much more!

Form the Brains
Wearing gloves brushed with a little oil, gently press and shape each mound into a lumpy brain form. Don’t worry about being perfect; the unevenness actually makes the gorey brain look more realistic.
Using disposable food-safe gloves lets you mold the brains without the marshmallow sticking all over your hands.
Add the Details
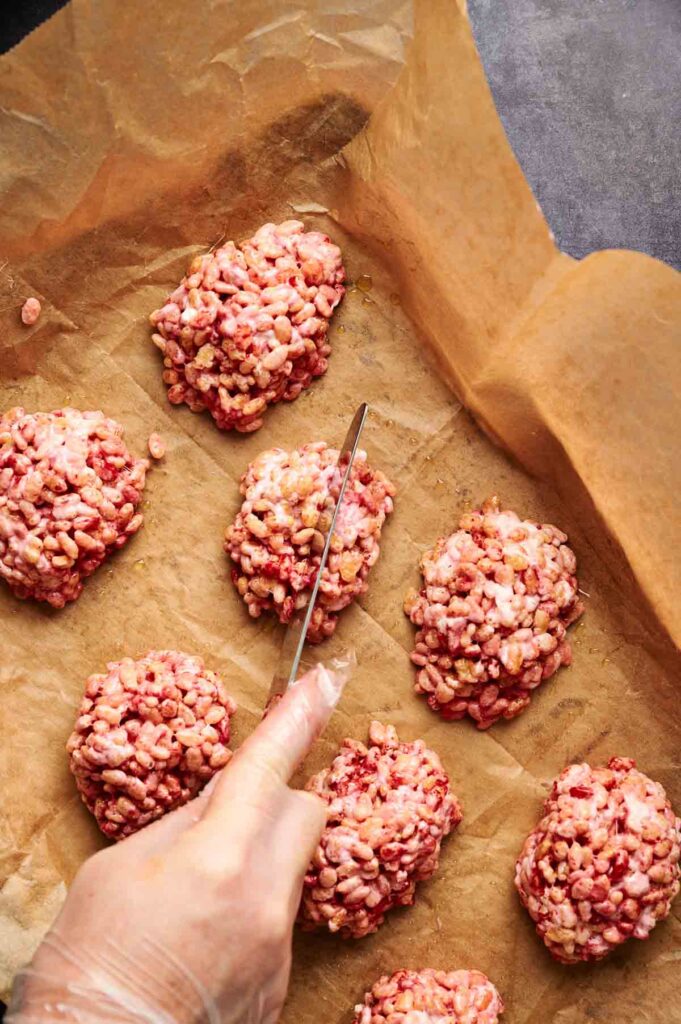
Take a table knife, brush it with a bit of oil, and press a line deep enough down the center of each brain to create an indent between the left and right hemispheres. Don’t press too deeply, or you might cut all the way through.
A butter knife with a rounded edge is ideal here, as it makes the groove without slicing all the way down, but even this multi-purpose spread tool also does the job well.
Adjust the shapes with your fingers as needed until it feels like you’re looking at small, actual brains. Repeat until you have 10–12 mini brains in total.
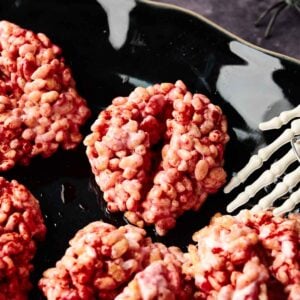
Top with Icing
Finish by drizzling or dotting red icing over the top to mimic blood. Let them sit at room temperature for 4–5 hours so they hold their shape better. After that, serve and enjoy!
If you’re bringing these to a Halloween potluck, pack them well in a hard-sided container lined with wax paper so they don’t get smashed or stick. Keep them at a consistent room temperature by sliding the container into an insulated thermal bag like this.
Halloween Rice Krispies Brains
Equipment
Ingredients
- 4 tablespoons butter
- 2 cups pink and white marshmallows
- 4 cups Rice Krispies cereal
- 1 tablespoon red food coloring
- Red icing for decorating
Instructions
- Line a large tray with nonstick baking paper.
- In a microwave-safe bowl, combine the marshmallows and butter. Heat in 1-minute intervals, stirring between each, until fully melted and smooth.2 cups pink and white marshmallows, 4 tablespoons butter
- Stir in the Rice Krispies and red food coloring until the mixture is evenly coated. This may take a little time, but it will come together.4 cups Rice Krispies cereal, 1 tablespoon red food coloring
- Lightly oil the front and back of two spoons. Scoop and drop mounds of the mixture onto the prepared tray.
- Wearing food-safe gloves brushed with a bit of oil, shape each mound into a rough brain form.
- To create the “brain crease,” lightly oil a table knife and press a line down the center of each mound, adjusting the shape with your oiled fingers as needed. Repeat until you have 10–12 brains.
- Decorate with drizzles or dots of red icing to mimic blood.Red icing
- Let the brains set at room temperature for 4–5 hours before serving.
Video
Notes
- Line your tray first: Always set up your tray with nonstick baking paper before you start adding anything, so you’re ready to scoop.
- Melt slowly: Heat the marshmallows in short bursts, stirring between each, to keep them from burning or turning rubbery.
- Mix fast: Once the cereal goes in, the mixture starts to set quickly. So, stir right away and continuously to coat everything evenly.
- Oil your tools: You’re working with a sticky mixture here, so lightly oil your spoons, gloves, and knife to stop it from clinging. Don’t use olive oil or any strong oil, as that can add an aftertaste to this sweet treat. Go with neutral oils like canola instead.
- Shape while warm: Don’t wait too long. Form the brains while the mixture is still pliable, or they’ll be too hard to work with once they’re cooled.
- Don’t forget the line at the center: Without it, the mounds just look like lumpy cereal balls, but adding that indent makes them instantly read as brains. It’s the small detail that turns sticky mounds into something creepy and brain-like, so don’t skip it.
- Decorate last: Hold off on the icing until the shapes are done so you don’t smudge the bloody details. Make sure you thin it out as well for the perfect streaks and drips that soak into the crevices of the Rice Krispies brains. Stiff icing won’t just give you the same effect.
- Let them sit for several hours: Give the brains 4–5 hours at room temperature so they firm up properly. Skipping or rushing this step leaves them too soft and sticky, which can cause them to lose their shape and make a mess when you try to serve them.
Nutrition
SERIOUSLY GOOD
DESSERTS!
Dessert First is a collection of 61 RECIPES to show you that you can make beautiful, impressive desserts right in your own kitchen, no matter your skill level.
Immediate eBook download. No physical book available.
Includes ad-free recipes like:
∙ Lemon Pound Cake
∙ Starbucks Cake Pops
∙ Boston Cream Pie
∙ Chocolate Mousse
∙ Matcha Tiramisu
...and much more!
Recipe Notes and Expert Tips
I’ve learned a few tricks along the way that make these Halloween Rice Krispies brains come together easily, and they’ll help you get the best results, too.
- Line your tray first: Always set up your tray with nonstick baking paper before you start adding anything, so you’re ready to scoop.
- Melt slowly: Heat the marshmallows in short bursts, stirring between each, to keep them from burning or turning rubbery.
- Mix fast: Once the cereal goes in, the mixture starts to set quickly. So, stir right away and continuously to coat everything evenly.
- Oil your tools: You’re working with a sticky mixture here, so lightly oil your spoons, gloves, and knife to stop it from clinging. Don’t use olive oil or any strong oil, as that can add an aftertaste to this sweet treat. Go with neutral oils like canola instead.
- Shape while warm: Don’t wait too long. Form the brains while the mixture is still pliable, or they’ll be too hard to work with once they’re cooled.
- Don’t forget the line at the center: Without it, the mounds just look like lumpy cereal balls, but adding that indent makes them instantly read as brains. It’s the small detail that turns sticky mounds into something creepy and brain-like, so don’t skip it.
- Decorate last: Hold off on the icing until the shapes are done so you don’t smudge the bloody details. Make sure you thin it out as well for the perfect streaks and drips that soak into the crevices of the Rice Krispies brains. Stiff icing won’t just give you the same effect.
- Let them sit for several hours: Give the brains 4–5 hours at room temperature so they firm up properly. Skipping or rushing this step leaves them too soft and sticky, which can cause them to lose their shape and make a mess when you try to serve them.
How to Store Leftovers
Keep your Rice Krispie Brains in an airtight container at room temperature for up to 2–3 days. No need to refrigerate, as it can cause them to firm up more than they should, making them a bit tough. Room temperature is enough; they stay chewy and fresh when sealed properly.
I use these glass food storage containers to be sure they don’t dry out or get stale while on the counter.
Freezing isn’t a good option for this recipe, since the marshmallow mixture turns too hard and loses the fun, soft bite (and nobody wants brain freeze at a Halloween party!). Thawing won’t help either, as the cereal can turn soggy and the brains lose their shape after that.
More Easy Recipes for You to Try at Home
I’ve got plenty more fun and creative sweets here that you can serve at parties or holidays, or even just when your brain tells you to.