Stuffing Balls are a fun and easy way to give new life to leftover stuffing. Baked until golden and crisp on the outside, soft and flavorful inside, they’re made with just a few ingredients, and the prep takes minutes. Whether you’re clearing out the fridge after Thanksgiving or planning ahead for a holiday potluck, this is a simple recipe that always delivers.

This post contains affiliate links. As an Amazon Affiliate, if you purchase through those links, I earn a commission. Thank you!
I started making these stuffing balls one year when I had way too many leftover Christmas side dishes and not enough fridge space. Now, leftovers have become one of my favorite things to look forward to after a holiday meal. I love how easy they are to pull together, and the crispy edges give my leftover stuffing a whole new personality. I usually eat a few straight off the baking sheet (no shame!) then save the rest to go with lunch or dinner the next day.
How to Make Stuffing Balls
I like to keep things effortless, especially after a big holiday meal. These stuffing balls come together quickly and bake up beautifully in the oven. Here’s how I make them:
Preheat the oven
Set your oven to 400ºF (200ºC). Line a baking sheet with parchment paper and lightly grease it with cooking spray or olive oil. This keeps the stuffing balls from sticking and helps them get golden on the bottom.
This rimmed baking sheet helps with even browning without warping in the oven, while a pre-cut parchment paper like this one makes cleanup easier and prevents sticking if your stuffing is a bit moist. For a lighter touch, I like using an oil sprayer; it’s less messy and gives just the right amount of coverage.
Mix the ingredients
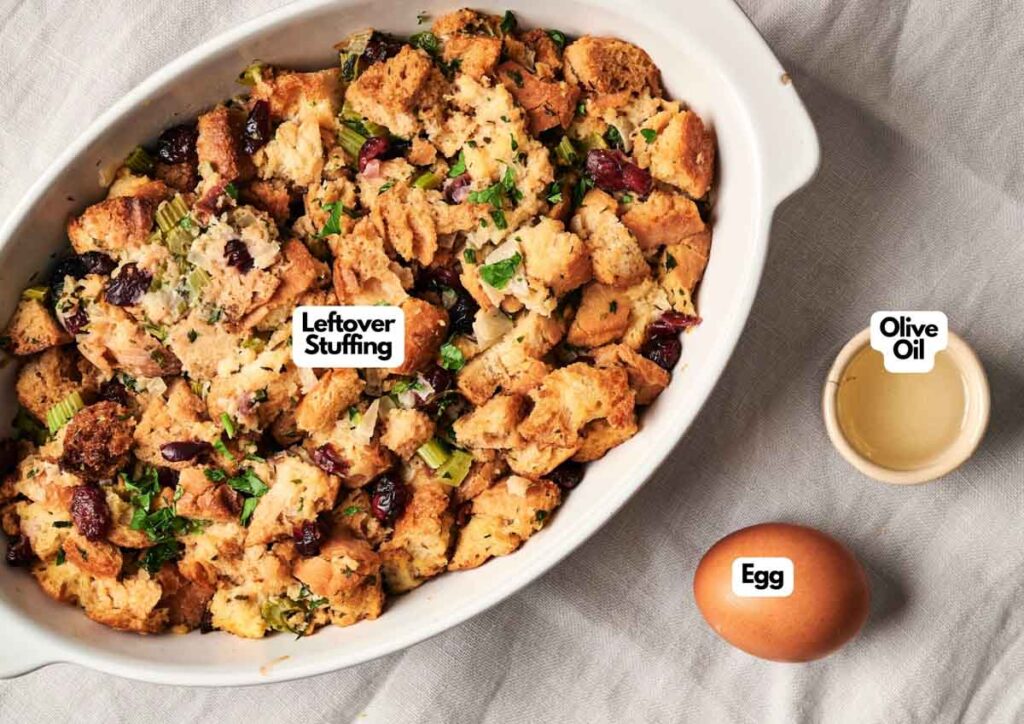
In a large bowl, combine the leftover stuffing with an egg. A large mixing bowl with a nonslip base makes this step a lot easier, especially if you’re working with cold stuffing.
The egg helps hold everything together while baking. If your stuffing is a little dry from the fridge, you can add a splash of chicken broth or vegetable broth to soften it up.
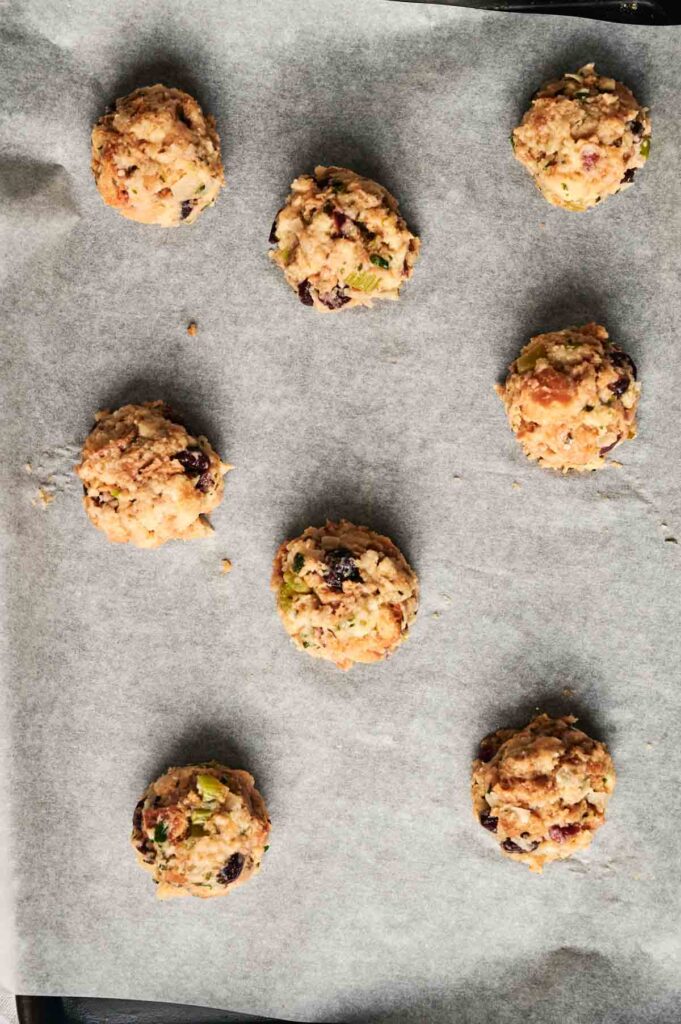
Shape the balls
Use an ice cream scoop or your hands to portion out the stuffing mixture. It’s way easier to keep them uniform using a cookie scoop like this one, and it speeds things up.
Roll each scoop into a ball, pressing gently so it holds its shape. I like them about golf ball-sized. Arrange them evenly on your prepared baking sheet.
Bake until golden
Pop the tray into the oven and bake for 20 minutes. They’re ready when the outsides are lightly crisp and golden brown. Let them cool for a few minutes before serving. Enjoy!
If you’re packing these up for a potluck, store them in a hard-sided container to keep them from getting crushed in transit. To help them stay warm, tuck the container inside an insulated casserole tote to lock in the heat until you’re ready to serve.
Optional add-ins
If you’re feeling creative, you can mix in extras like chopped fresh parsley, cooked onions, a sprinkle of black pepper, or a pinch of poultry seasoning for more flavor. A few dried cranberries or finely chopped celery work well, too.

Stuffing Balls
Equipment
Ingredients
- 4 cups leftover stuffing
- 1 large egg
- Cooking spray or olive oil
Instructions
- Preheat the oven to 400ºF (200°C). Line a baking sheet with parchment paper. Line a baking sheet with parchment paper and lightly grease it with cooking spray or olive oil.Cooking spray or olive oil
- In a big bowl, combine the leftover stuffing and egg until everything is well incorporated and the stuffing is soft.4 cups leftover stuffing, 1 large egg
- Use an ice cream scoop to form stuffing balls, press them with your hands to compact them, and arrange them in the sheet.
- Bake for 20 minutes, or until they are golden brown.
- Serve and enjoy!
Notes
- Moisture Check: If your stuffing is too dry, add a tablespoon or two of broth to soften it before forming the balls.
- Compact Gently: Press the stuffing just enough to hold the shape. Too tight and they’ll get dense, too loose and they might fall apart.
- Size: Keep them uniform so they cook evenly. I aim for golf ball size.
- Flavor Boost: Add chopped fresh herbs like parsley, thyme, or a tiny pinch of sage if your stuffing needs a little lift. You can also add a few leftover veggies for a bit of an extra bite and texture. Just chop them finely so they blend well with the stuffing.
- Crispy: For extra crunch, spray the tops with olive oil before baking.
- Make-Ahead: You can shape the balls and chill them in the fridge a few hours before baking if needed.
- Gluten-free: This recipe works well for gluten-free stuffing too!
Storage and Reheating Instructions
- Fridge: Once cooled, pop any leftovers into an airtight container and keep them in the fridge for up to 4 days.
- Reheat: They reheat well in the oven or air fryer if you want to bring back that crispy outside.
- Freeze: You can also freeze them. Just lay them on a baking sheet to freeze individually, then transfer to a freezer bag. They’ll keep for a month or two and make a quick, savory snack or side when you’re short on time.
Nutrition
Recipe Notes and Tips
I like to keep things flexible with these, so here are a few quick tips to help you get the best results:
- Moisture Check: If your stuffing is too dry, add a tablespoon or two of broth to soften it before forming the balls.
- Compact Gently: Press the stuffing just enough to hold the shape. Too tight and they’ll get dense, too loose and they might fall apart.
- Size: Keep them uniform so they cook evenly. I aim for golf ball size.
- Flavor Boost: Add chopped fresh herbs like parsley, thyme, or a tiny pinch of sage if your stuffing needs a little lift. You can also add a few leftover veggies for a bit of an extra bite and texture. Just chop them finely so they blend well with the stuffing.
- Crispy: For extra crunch, spray the tops with olive oil before baking.
- Make-Ahead: You can shape the balls and chill them in the fridge a few hours before baking if needed.
- Gluten-free: This recipe works well for gluten-free stuffing too!
How to Store Leftover Stuffing Balls
Once cooled, pop any leftovers into an airtight container and keep them in the fridge for up to 4 days. I like using a locking-lid airtight container that keeps everything fresh and stackable in the fridge. They reheat well in the oven or air fryer if you want to bring back that crispy outside.
You can also freeze them. Just lay them on a baking sheet to freeze individually, then transfer to a freezer bag. I reach for my durable freezer bag, which stores easily in my freezer without taking up much space. They’ll keep for a month or two and make a quick, savory snack or side when you’re short on time.
What to Serve With Stuffing Balls
Stuffing balls are super versatile. I usually serve them with leftover turkey, chicken, or a cozy bowl of leek and potato soup. They’re perfect next to cauliflower casserole, with a drizzle of gravy, or even cranberry sauce if you’ve got some hanging around. I’ve also tossed a few into salads for a warm, savory crunch.
More Leftover Recipes You Will Love
I love turning leftovers into something new and tasty. If you liked these stuffing balls, here are a few more easy favorites to try:
- Turkey Sliders (leftover turkey)
- Thanksgiving Casserole (leftover Thanksgiving dinner)
- Chicken Cordon Bleu Casserole (leftover chicken and ham)
- Philly Cheesesteak Sliders (leftover steak or roast beef)
- Chicken Pot Pie Soup (leftover chicken or turkey)