Shamrock Bark is the easiest way I know to make something cute and festive with almost zero effort. Dark chocolate and cool, minty green white chocolate come together in the prettiest layers, topped with shamrock gumdrops, mini chocolate chips, and crunchy pecans. It’s fun, absolutely delicious, and gone even before you know it.
This post contains affiliate links. As an Amazon Affiliate, if you purchase through those links, I earn a commission. Thank you!
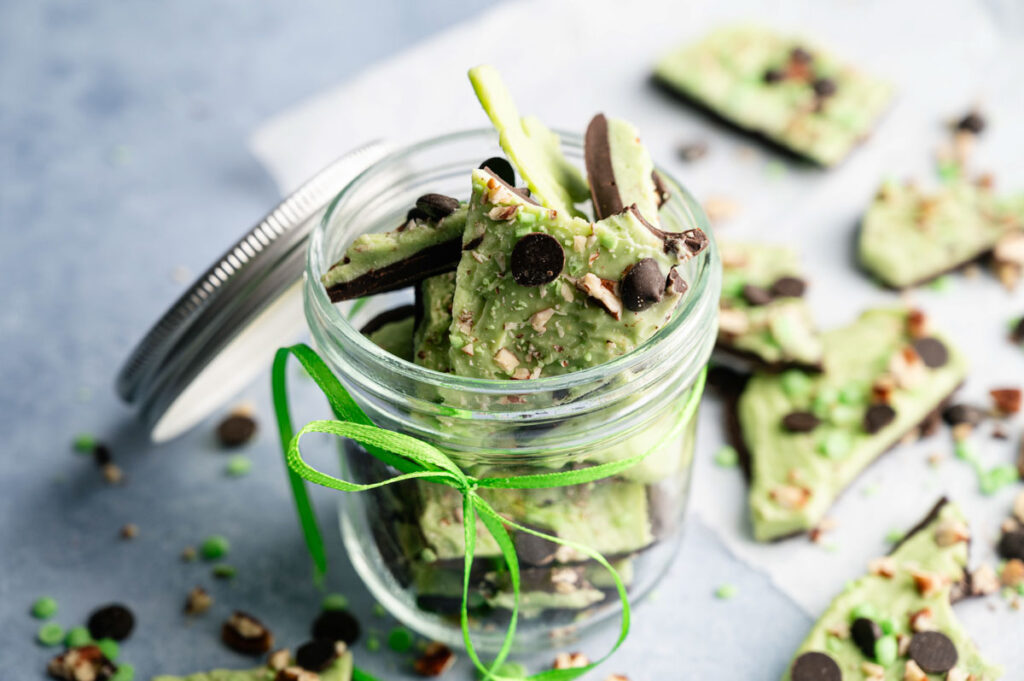
I make this for St. Patrick’s Day parties, classroom treats, and office dessert tables because it’s cute, easy to package, and travels beautifully. Kids love the shamrock gumdrops and minty flavor, and adults can’t stay away either. It’s budget-friendly, makes a big batch, and it’s perfect for gifting. Store in an airtight container in the fridge for up to 2 weeks or in the freezer for about 2 months.
Ingredients You’ll Need
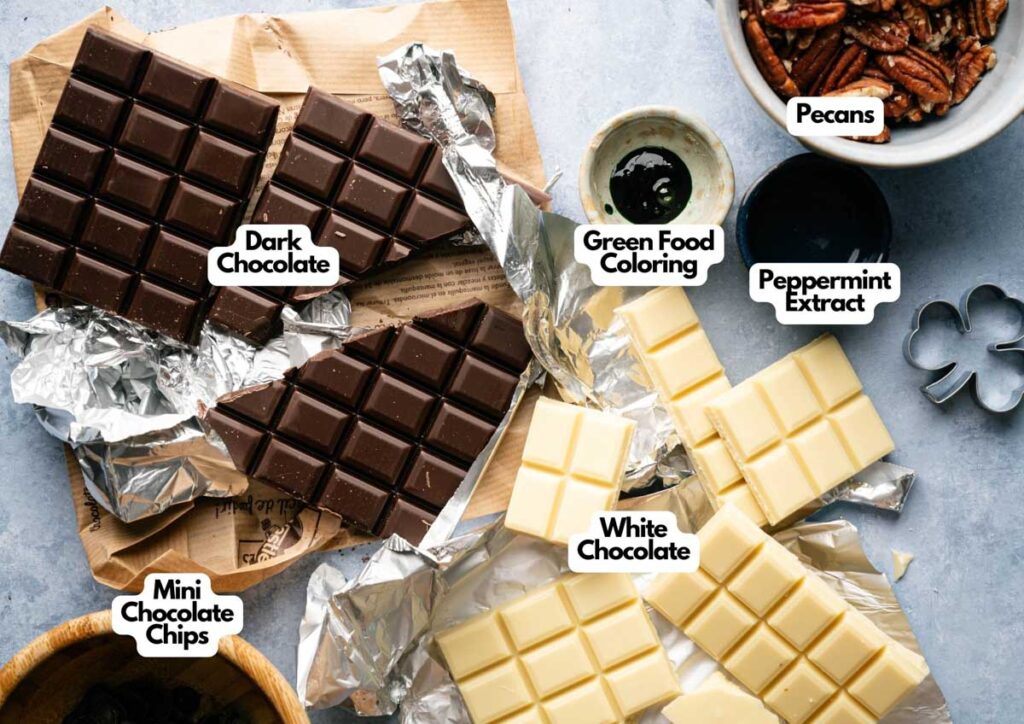
You’ll need all the ingredients shown in the photograph below.
How to Make Shamrock Bark with Step-By-Step Instructions
Scroll down for the full recipe card containing a full printable recipe and measurements in both US customary and metric units.
Making bark is one of the most forgiving candy projects because there’s no tempering or candy thermometer involved.
Line and Prep Your Baking Sheet
Line a small baking sheet with parchment paper. I use precut parchment paper because it makes it easier to lift the bark off once it’s set, and it stays flat on the baking tray. A sturdy half-sheet pan works perfectly for spreading the chocolate into a thin, even layer.
Melt the Dark Chocolate
In a microwave-safe prep bowl, microwave the dark chocolate in 20-second intervals, stirring each time, until smooth. Don’t rush this step, or you’ll end up with seized chocolate that won’t spread properly.
After it’s melted, you can add a little bit of coconut oil for extra gloss, shine, and spreadability, though that’s totally optional. It won’t alter the flavor.
Spread and Chill the Base Layer
Spread the melted chocolate with an offset spatula into a thin, even layer on the prepared baking sheet. Push the chocolate all the way to the edges for a clean, professional look.
The thinner you spread it, the easier it’ll be to break into pieces later. If you don’t want it to break too easily, go a little thicker, but not so thick that it’s hard to break.
Refrigerate for about 15 minutes until firm but not completely hardened. You want the surface to be set enough that the white chocolate won’t sink through, but still slightly tacky so the layers bond together.
Melt and Flavor the White Chocolate
Make the green chocolate by melting the white chocolate in a separate bowl in 20-second intervals, stirring until smooth. Once melted, stir peppermint extract and a few drops of green food coloring.
Start with just 2-3 drops of green because you can always add more, but you can’t take it back. You can also use green candy melts for a shortcut and skip the food coloring if you’re short on time. Just don’t forget the peppermint extract because it adds a fun flavor to this treat.
SERIOUSLY GOOD
DESSERTS!
Dessert First is a collection of 61 RECIPES to show you that you can make beautiful, impressive desserts right in your own kitchen, no matter your skill level.
Immediate eBook download. No physical book available.
Includes ad-free recipes like:
∙ Lemon Pound Cake
∙ Starbucks Cake Pops
∙ Boston Cream Pie
∙ Chocolate Mousse
∙ Matcha Tiramisu
...and much more!

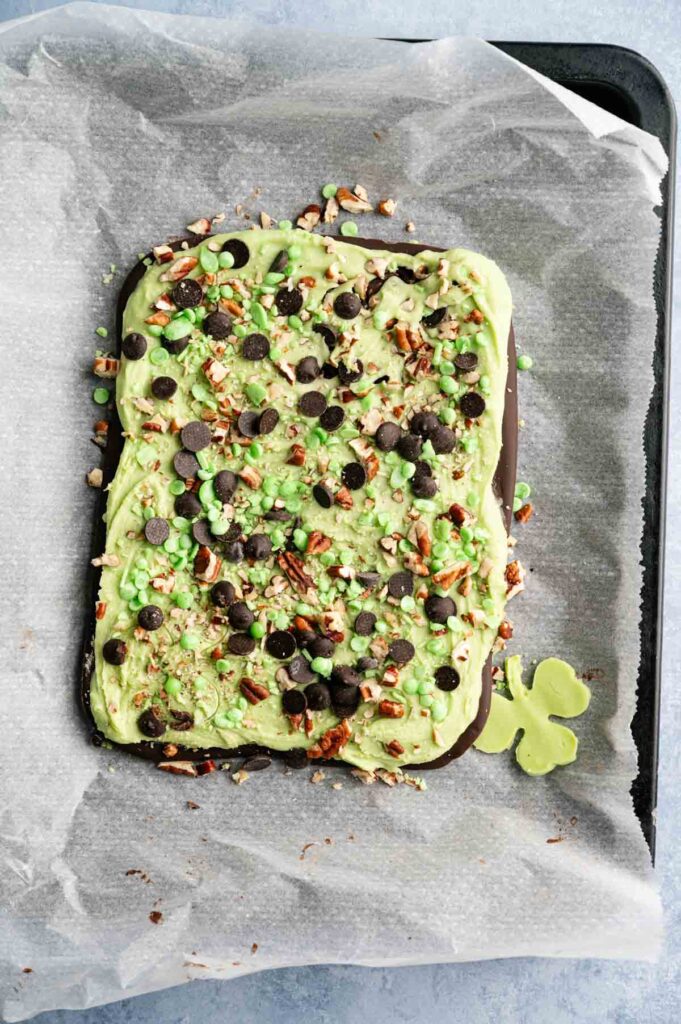
Add the Minty Green Layer
Pour the mint-flavored white chocolate over the dark chocolate layer and spread evenly. Work quickly here because white chocolate sets faster than you think, especially when it hits the cold dark chocolate base.
If you’re feeling a little extra creative, drop small dots of extra melted white or dark chocolate onto the surface if you’ve saved some, then gently drag a toothpick in a circular motion to create swirls or form a marbled look while the chocolate’s still wet.
Add Toppings and Let It Set
Immediately sprinkle gumdrops, mini chocolate chips, and chopped pecans on top and gently press them down. You could also add more toppings like shamrock sprinkles, green sprinkles, rainbow sprinkles, rainbow candy, or M&M’s if desired.
Press the toppings in lightly so they stick and don’t fall off when you break the bark later. A nut chopper or a mini food processor makes quick work of chopping pecans if you’re using whole ones.
Refrigerate for 30-40 minutes until fully set. The bark should feel completely firm and cold to the touch before you try to break it.
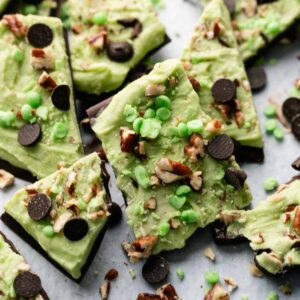
Break and Enjoy
Break into pieces and serve on a platter so everyone can easily grab one, or transfer to a jar or container if you’re going to eat them later. I like to break mine into irregular shards because it looks more rustic and homemade, but you can also cut it into perfect squares with a knife.
Serve this cute, delicious treat and enjoy!
Shamrock Bark travels well as long as you keep it cool. Layer the pieces between sheets of parchment paper in an airtight container to prevent them from sticking together, and pack the container in a cooler with ice packs if you’re heading to a potluck or party.
The chocolate can soften in warm temperatures, so avoid leaving it in a hot car or sitting out on a buffet table for more than an hour. If you’re gifting it, use a hard-sided gift box or a cellophane treat bag and keep the packaged bark chilled in the fridge until you’re ready to leave.
Shamrock Bark
Ingredients
- 8 ounces dark or semi-sweet chocolate chips
- 8 ounces white chocolate chips
- ½ teaspoon peppermint extract
- Green food coloring
Toppings:
- Green sugar-coated shamrock gumdrop candies
- 2 tablespoons mini chocolate chips
- ¼ cup chopped pecans
Instructions
- Line a baking sheet with parchment paper.
- Microwave the dark chocolate in 20-second intervals, stirring each time, until smooth.8 ounces dark or semi-sweet chocolate chips
- Spread the melted dark chocolate into a thin, even layer on the prepared baking sheet.
- Refrigerate for about 15 minutes until firm but not completely hardened.
- Melt the white chocolate in 20-second intervals, stirring until smooth.8 ounces white chocolate chips
- Stir peppermint extract and a few drops of green food coloring into the melted white chocolate.½ teaspoon peppermint extract, Green food coloring
- Pour the mint-flavored white chocolate over the dark chocolate layer and spread evenly.
- Immediately sprinkle gumdrops, mini chocolate chips, and chopped pecans on top and gently press them down.Green sugar-coated shamrock gumdrop candies, 2 tablespoons mini chocolate chips, ¼ cup chopped pecans
- Refrigerate for 30–40 minutes until fully set.
- Break into pieces and store in an airtight container in the refrigerator.
Video
Notes
Nutrition
SERIOUSLY GOOD
DESSERTS!
Dessert First is a collection of 61 RECIPES to show you that you can make beautiful, impressive desserts right in your own kitchen, no matter your skill level.
Immediate eBook download. No physical book available.
Includes ad-free recipes like:
∙ Lemon Pound Cake
∙ Starbucks Cake Pops
∙ Boston Cream Pie
∙ Chocolate Mousse
∙ Matcha Tiramisu
...and much more!
How to Store Leftovers
Keep Shamrock Bark covered in an airtight container in the refrigerator for up to 2 weeks. Storing it at room temp in a glass cookie jar is also fine as long as your kitchen isn’t too warm. The chocolate stays firm, and the peppermint flavor actually gets stronger after a day or two.
If you want to freeze it, layer the pieces between parchment paper in a freezer-safe container or freezer bag and freeze for up to 3 months. Thaw in the fridge overnight before serving to prevent condensation and keep the chocolate from sweating.
What to Serve With Shamrock Bark
It pairs well with Irish coffee, hot chocolate, or a cold glass of milk if you’re serving it to kids. I also like to set it out alongside other St. Patrick’s Day treats like sugar cookies or green cupcakes for a festive dessert spread.
You can also crumble it over vanilla ice cream or use it as a garnish for mint chocolate chip milkshakes. The gumdrops, pecans, and candy add texture, so it works as both a standalone treat and a topping for other desserts.
More Easy Recipes for You to Try at Home
I think you’ll love these other easy and fun dessert recipes.