This Rocky Road Ice Cream recipe is creamy, chocolatey, and packed with marshmallows and crunchy nuts. It’s everything you love about your favorite ice cream flavor—made at home with simple ingredients and no ice cream machine required. It’s an easy dessert that’s great for hot days, birthday parties, or when you’re just craving something sweet and chocolatey.

This post contains affiliate links. As an Amazon Affiliate, if you purchase through those links, I earn a commission. Thank you!
For me, this one’s a classic. The rich chocolate flavor, the soft bite of mini marshmallows, and the crunch from the nuts hit all the right notes. I usually make it on weekends so it’s ready by the time I need a cold treat in the evening. It tastes just as good—if not better—than anything you’d get from the store. Plus, I like knowing exactly what’s in it.
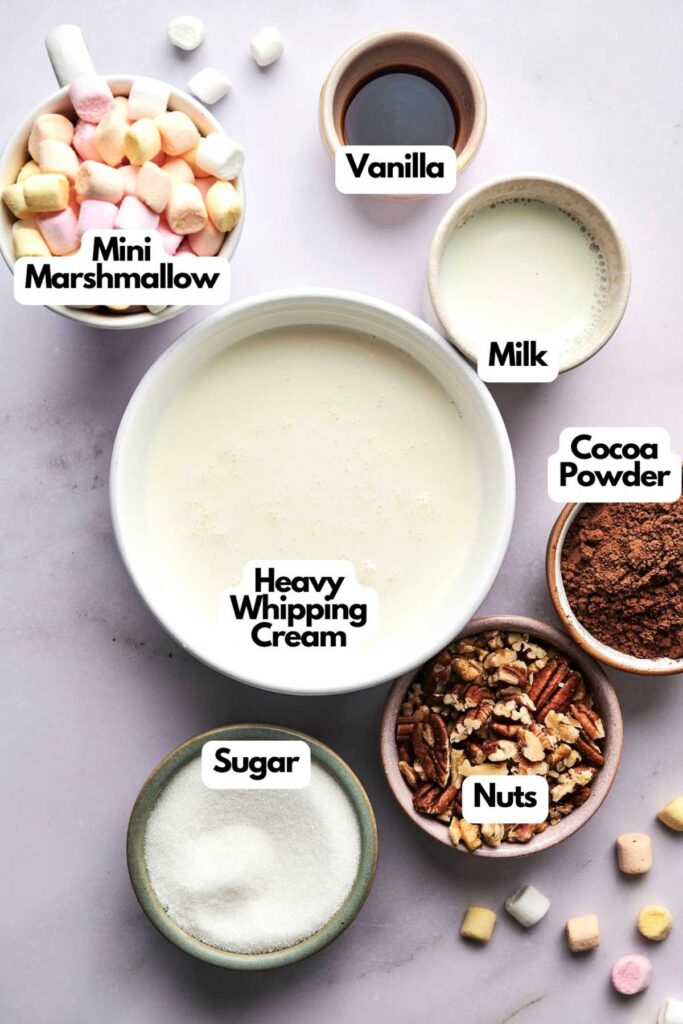
Ingredients You’ll Need
You’ll need all the ingredients shown in the photograph below.
How to Make Rocky Road Ice Cream
Scroll down for the full recipe card containing a full printable recipe and measurements in both US customary and metric units.
I like how simple this chocolate ice cream recipe is once you break it down. Here’s how to make creamy Rocky Road Ice Cream step by step.
Warm the milk, cocoa, and sugar
In a medium saucepan over medium heat, whisk together the whole milk, cocoa powder, and sugar. I use this balloon whisk because it’s lightweight and doesn’t leave you with wrist fatigue after a minute of stirring.
Keep whisking until the mixture is smooth and everything’s fully dissolved. No need to let it boil—just warm it through.
Chill the chocolate base
Take the saucepan off the heat and pour the milk mixture into a container. I like using these glass storage bowls with lids—they’re durable, stackable, and the lids make it easy to pop them right in the fridge without worrying about spills.
Pop it in the fridge and let it chill completely. Cold base = better texture when churning.
Mix in the cream and vanilla
Stir together the heavy cream and vanilla extract in a separate bowl. I use my angled measuring cup to measure the vanilla since it’s so easy to see from above and avoids that awkward eye-level lean. This gives the ice cream a rich, creamy finish.
SERIOUSLY GOOD
DESSERTS!
Dessert First is a collection of 61 RECIPES to show you that you can make beautiful, impressive desserts right in your own kitchen, no matter your skill level.
Immediate eBook download. No physical book available.
Includes ad-free recipes like:
∙ Lemon Pound Cake
∙ Starbucks Cake Pops
∙ Boston Cream Pie
∙ Chocolate Mousse
∙ Matcha Tiramisu
...and much more!

Churn the ice cream
Pour the chilled chocolate mixture and heavy cream mixture into your ice cream maker and churn for about 20 minutes, or until it’s the consistency of soft serve.
If you’re using a compact model like this Ice Cream Maker, just make sure the bowl is pre-frozen—mine lives in the freezer year-round now, which solves the problem of forgetting to chill it ahead of time. Follow your machine’s instructions if they’re different.
Fold in the mix-ins
Pause the machine and gently fold in ½ cup of chopped nuts and ½ cup of mini marshmallows.
If your ice cream maker doesn’t have room, transfer the ice cream to a bowl and stir it in with a silicone spatula like this one. It’s flexible enough to really get into the corners without smashing the mix-ins.
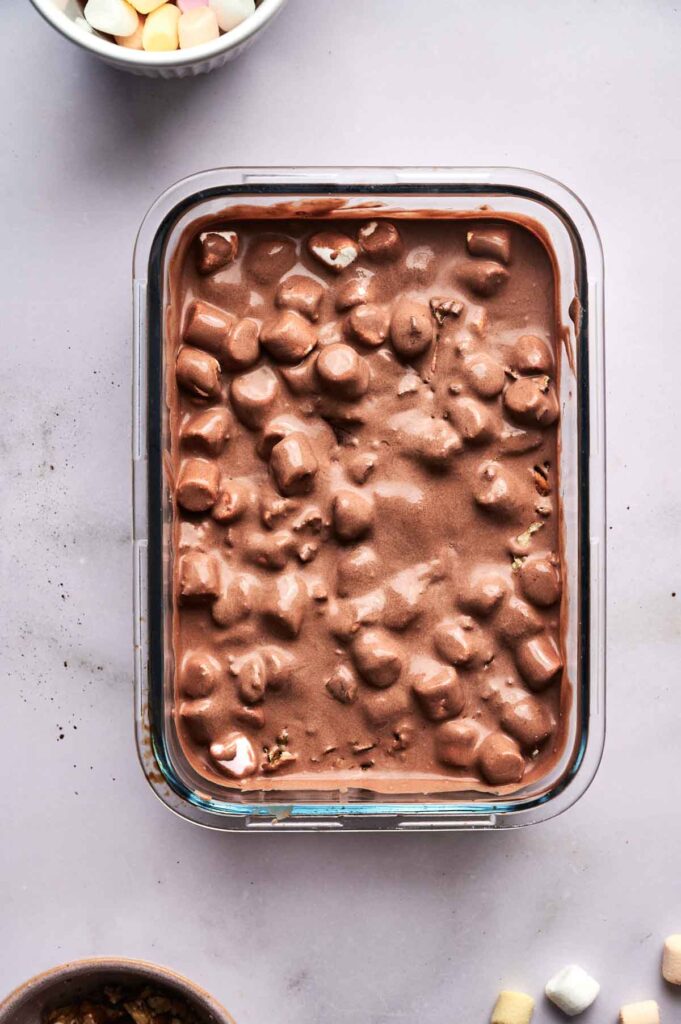
Freeze until firm
Spoon the ice cream into a loaf pan or another freezer-safe container. I love using this nonstick loaf pan because the ice cream scoops out so easily after freezing.
Sprinkle the rest of the nuts and marshmallows on top, then freeze for at least 3 hours or until firm.
I usually serve this Rocky Road Ice Cream in these glass dessert cups that have just the right balance of looking fancy without being fussy. If I’m going all out for a special occasion, I’ll use my Italian dessert cups; they’re simple and oh so stylish.

Rocky Road Ice Cream
Ingredients
- 1 ½ cups milk
- ½ cup cocoa powder
- 1 cup sugar
- 2 cups heavy whipping cream
- 1 teaspoon vanilla
- ¾ cup nuts divided
- 1 cup mini marshmallows divided
Instructions
- In a saucepan over medium heat, combine the milk, cocoa powder, and sugar. Whisk continuously until everything dissolves into a smooth, chocolatey mixture. No need to boil—just heat until smooth.1 ½ cups milk, ½ cup cocoa powder, 1 cup sugar
- Remove from heat and pour the chocolate base into a container. Chill in the refrigerator until completely cold.
- In a separate bowl, mix the heavy cream with the vanilla extract.2 cups heavy whipping cream, 1 teaspoon vanilla
- Pour the chilled chocolate mixture and cream mixture into your ice cream maker. Churn for about 20 minutes, or until it reaches a soft-serve consistency.
- Pause the machine and fold in ½ cup chopped nuts and ½ cup mini marshmallows. If your machine doesn’t have room, transfer everything to a mixing bowl and gently stir them in.¾ cup nuts, 1 cup mini marshmallows
- Spoon the ice cream into a loaf pan or freezer-safe container. Sprinkle with the remaining nuts and marshmallows.
- Freeze for at least 3 hours, or until firm.
Video
Notes
- Use good cocoa powder: Go for unsweetened cocoa powder for a deep chocolate flavor. Dutch-process cocoa works great too.
- Chill completely: Don’t skip chilling the chocolate base. Cold mixture gives you creamier ice cream.
- Nut options: Use your favorite kind! I like roasted almonds or walnuts, but pecans, peanuts, or hazelnuts work too.
- Marshmallow mix-in tip: Cut larger marshmallows if that’s what you’ve got—mini ones just fold in more evenly.
- Add texture: Toasting the nuts before adding them gives an extra crunch and flavor.
- No ice cream maker: You can freeze the base in a loaf pan, stirring every 30 minutes for a few hours until creamy.
- Other additions: Feel free to add in mini semi-sweet chocolate chips, or shortbread cookies broken into small chunks.
Storage Instructions
- Freeze: Store any leftover Rocky Road Ice Cream in an airtight container in the freezer. For the best texture, press a piece of plastic wrap or parchment paper directly onto the surface of the ice cream before sealing the lid. This helps prevent ice crystals from forming.
- Shelf life: It’ll stay fresh for up to two weeks, but honestly, it never lasts that long in my freezer!
- Serve: When you’re ready to serve, let it sit at room temperature for 5-10 minutes before scooping.
Nutrition
SERIOUSLY GOOD
DESSERTS!
Dessert First is a collection of 61 RECIPES to show you that you can make beautiful, impressive desserts right in your own kitchen, no matter your skill level.
Immediate eBook download. No physical book available.
Includes ad-free recipes like:
∙ Lemon Pound Cake
∙ Starbucks Cake Pops
∙ Boston Cream Pie
∙ Chocolate Mousse
∙ Matcha Tiramisu
...and much more!
Recipe Notes and Tips
I’ve picked up a few helpful tricks after making this recipe a few times—here’s what I recommend:
- Use good cocoa powder: Go for unsweetened cocoa powder for a deep chocolate flavor. Dutch-process cocoa works great too.
- Chill completely: Don’t skip chilling the chocolate base. Cold mixture gives you creamier ice cream.
- Nut options: Use your favorite kind! I like roasted almonds or walnuts, but pecans, peanuts, or hazelnuts work too.
- Marshmallow mix-in tip: Cut larger marshmallows if that’s what you’ve got—mini ones just fold in more evenly.
- Add texture: Toasting the nuts before adding them gives an extra crunch and flavor.
- No ice cream maker: You can freeze the base in a loaf pan, stirring every 30 minutes for a few hours until creamy.
- Other additions: Feel free to add in mini semi-sweet chocolate chips, or shortbread cookies broken into small chunks.
How to Store Leftover Rocky Road Ice Cream
Store any leftover Rocky Road Ice Cream in an airtight container in the freezer. For the best texture, press a piece of plastic wrap or parchment paper directly onto the surface of the ice cream before sealing the lid. This helps prevent ice crystals from forming.
It’ll stay fresh for up to two weeks, but honestly, it never lasts that long in my freezer! When you’re ready to serve, let it sit at room temperature for 5-10 minutes before scooping.
What to Serve With Rocky Road Ice Cream
Rocky Road Ice Cream is already packed with flavor, but it pairs perfectly with warm strawberry cheesecake brownies, chocolate chip cookies, or even German chocolate cake.
I sometimes scoop it into cones or layer it in a sundae with whipped cream and sprinkles for an easy dessert. They look fabulous on the table at a gathering in this cone display holder.
More Recipes You Will Love
If you’re into homemade treats like this Rocky Road Ice Cream, I think you’ll love these too: