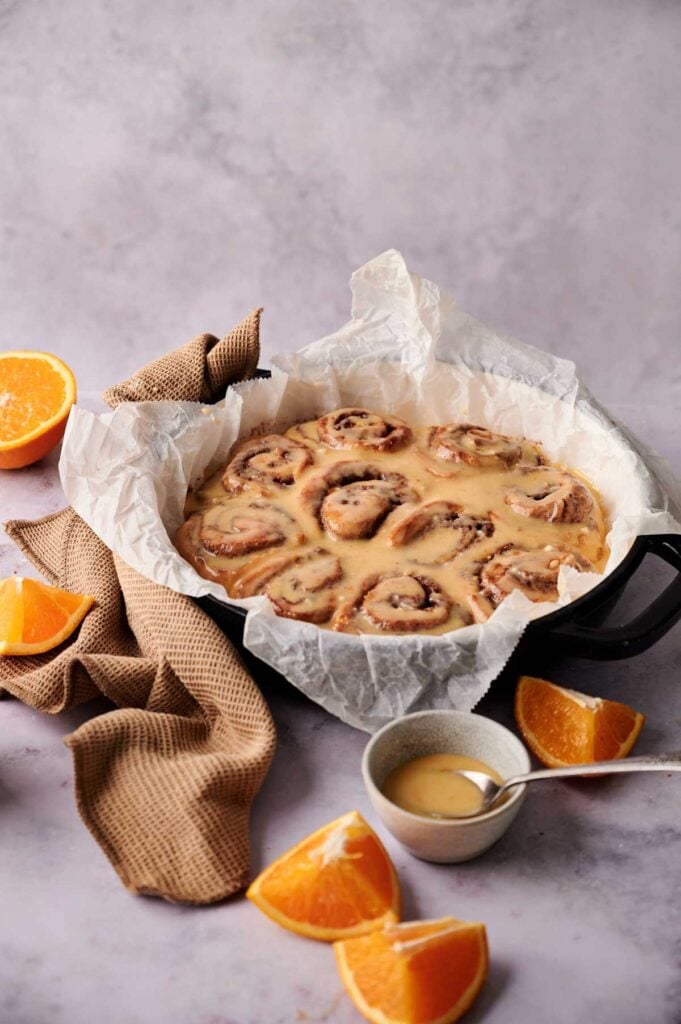
I love how the soft, pillowy dough of these Orange Rolls wraps around a bright, citrusy filling that wakes up your taste buds without being overpowering. Everything comes together from scratch, and there’s one little step that really makes the orange flavor pop; once you’ve tried it, you might find yourself making these instead of regular cinnamon rolls more often.
This post contains affiliate links. As an Amazon Affiliate, if you purchase through those links, I earn a commission. Thank you!
For a brunch spread or a cozy get-together, this orange roll recipe is a reliable favorite. I like that I can have them ready in advance, keep them stored, or tuck a batch in the freezer until the day I want to serve them. You just warm them up and they’re good to go. It’s a simple way to make any gathering feel a little more special.
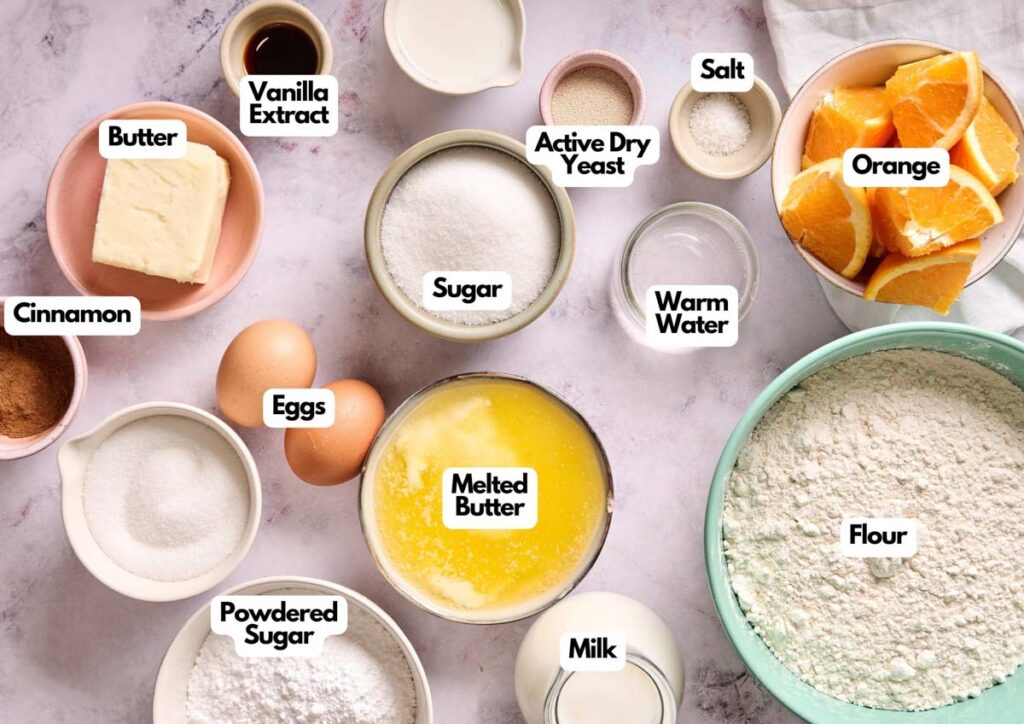
Ingredients You’ll Need
You’ll need all the ingredients shown in the photograph below.
How to Make Orange Rolls with Step-By-Step Instructions
Scroll down for the full recipe card containing a full printable recipe and measurements in both US customary and metric units.
If you follow my easy steps, you’ll be surprised at how simple it is to get bakery-style orange rolls at home.
Make the Dough
In a small bowl, mix warm water (about 110°F), yeast, and a tablespoon of sugar. I use this small glass prep bowl as it’s just the right size for this, and it also has a lid. Let it sit for 5–10 minutes until foamy; this makes sure your yeast is active.
In the large bowl of a stand mixer with a dough hook attachment, whisk together melted butter, milk, half a cup of sugar, eggs, and orange zest. This powerful stand mixer, designed for heavy-duty tasks like this, saves time and mixes everything well without overmixing.
Pour the yeast mixture onto the liquid mixture, then add flour and salt, mixing until a soft dough forms. Avoid overworking the dough, as it can make the rolls dense and heavy instead of light and fluffy.
Knead and Let Rise
Sprinkle a bit of flour on a clean surface and gently knead the dough for 1–2 minutes, just until it becomes smooth and elastic. I like using a silicone baking mat here to keep cleanup quick and prevent sticking.
Again, you don’t need to work it for long; you simply want to bring the dough together before placing it in a greased bowl. To grease, I use an oil sprayer like this one, as it makes this task super quick and simple.
Cover and let it rise in a warm spot for about 2 hours, or until doubled in size. Covering with plastic wrap keeps the dough from drying out during the rise, so make sure it’s covered.
Prepare the Filling
In a medium bowl, beat softened butter, sugar, and cinnamon together until evenly combined, then stir in the orange zest so it’s evenly distributed through the mixture. A hand mixer makes this step faster and smoother than mixing by hand.
For blending, this wooden spoon works well without over-whipping. And to make sure that nothing goes to waste, I scrape every bit of the filling out of the bowl using this flexible silicone spatula.
SERIOUSLY GOOD
DESSERTS!
Dessert First is a collection of 61 RECIPES to show you that you can make beautiful, impressive desserts right in your own kitchen, no matter your skill level.
Immediate eBook download. No physical book available.
Includes ad-free recipes like:
∙ Lemon Pound Cake
∙ Starbucks Cake Pops
∙ Boston Cream Pie
∙ Chocolate Mousse
∙ Matcha Tiramisu
...and much more!

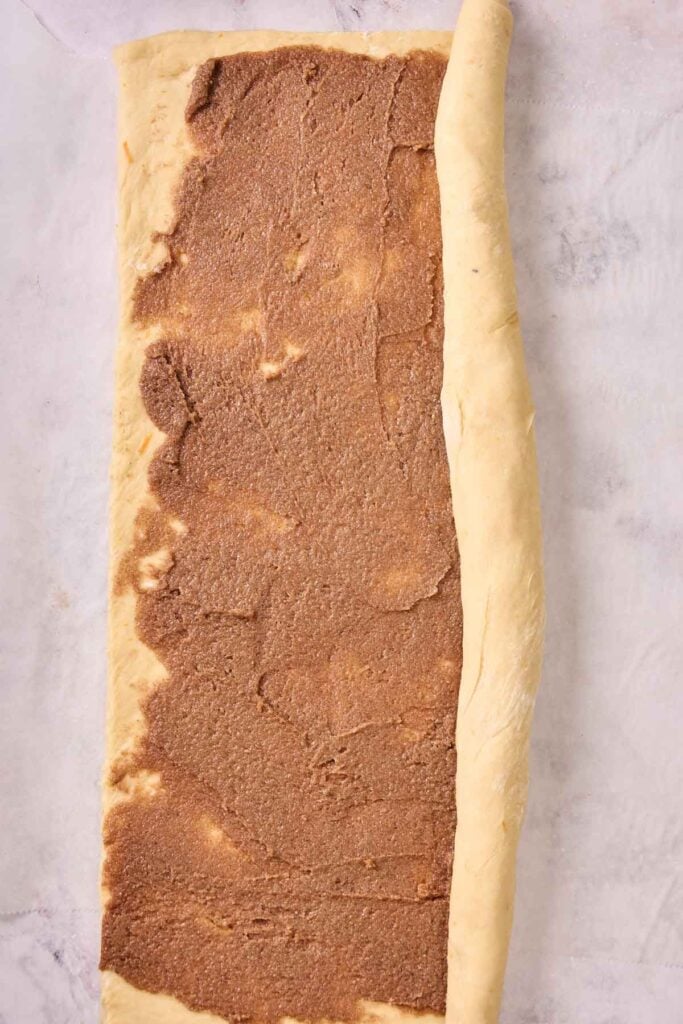
Roll and Fill the Dough
Punch down the risen dough to release the excess air that built up during proofing, which helps create a more even texture. Then roll it out on a lightly floured surface into a large rectangle, about ¼ inch thick. This large rolling pin helps me get an even thickness throughout.
Spread the filling evenly, leaving a ½-inch border around the edges to prevent the filling from leaking out while rolling and baking. An offset spatula like this makes it easier to spread the filling without tearing the dough.
Roll the dough up tightly from the long side, but not so tight that the dough tears or the filling oozes out, then slice into 1½-inch rolls using a sharp knife or dental floss for neat cuts. A serrated bread knife gives me clean slices every time without squashing the rolls.
You can also use an unflavored dental floss like this one; it works just as great and cuts the rolls smoothly without squishing them.
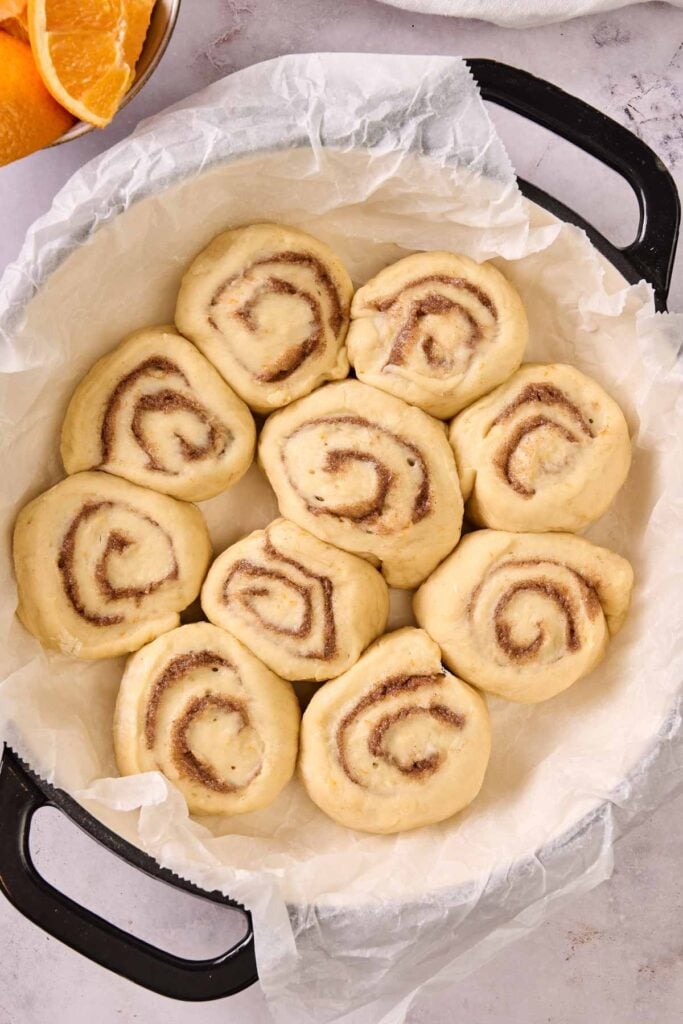
Arrange the rolls in a greased or parchment-lined baking dish or a Dutch oven, loosely covered to keep the surface from drying out during this final proof, and let them rise again until puffy. This pre-cut parchment paper helps prevent sticking.
Bake and Cool
Bake the rolls in the preheated oven at 350°F (180°C) until the tops are golden brown and the centers are fully cooked, about 25–30 minutes.
To check for doneness, insert a toothpick into the center of a roll. If it comes out clean or with just a few moist crumbs, they’re ready. These toothpicks are sturdy and great for testing baked goods without leaving big holes.
For extra accuracy, use an instant-read thermometer; the center should register around 190°F (88°C). I reach for my clip-on thermometer right here, which has an adjustable rotating screen and backlit display, making it easy for me to see the temperature clearly.
Let the rolls cool slightly in the pan for 5–10 minutes before glazing, and transfer them to a wire rack after that short cooling period to prevent the bottoms from getting too soft. This nonstick cooling rack helps keep the bottoms from steaming and going soggy.
Make the Orange Glaze
In another bowl, whisk powdered sugar, milk, orange juice, orange zest, and vanilla together until smooth. I use this small silicone whisk to keep the glaze lump-free and silky.
Drizzle generously over the warm rolls so it soaks in slightly and adds the final burst of citrus flavor. Make sure to get to the edges, so you get the perfect sweet-tangy glaze in every bite.
Serve Warm
These rolls are at their best while warm, especially with coffee, tea, or a glass of cold milk for a simple but satisfying treat. Serve as a breakfast or as a dessert, and enjoy!
If you’re bringing these to a potluck or holiday brunch, pack them in a hard-sided container so they don’t get smashed. To keep them warm, slip that container into an insulated casserole tote so they’re still soft and fresh like they just came out of the oven when served.

Orange Rolls
Equipment
Ingredients
For the Dough:
- 1 tablespoon active dry yeast
- ¼ cup warm water about 110°F
- ½ cup granulated sugar plus 1 tablespoon (for proofing)
- ½ cup unsalted butter melted
- ½ cup whole milk
- 2 large eggs
- 1 tablespoon orange zest from about 1 orange
- 4 cups all-purpose flour
- ¾ teaspoon salt
For the Filling:
- ½ cup unsalted butter softened
- ½ cup granulated sugar
- 2 tablespoons ground cinnamon
- 1 tablespoon orange zest
For the Orange Glaze:
- 3 cups powdered sugar
- ¼ cup milk
- 3 tablespoons fresh orange juice
- 2 teaspoons orange zest
- ½ teaspoon vanilla extract
Instructions
Make the Dough:
- In a small bowl, mix the warm water, yeast, and 1 tablespoon sugar. Let it sit for 5–10 minutes until foamy.1 tablespoon active dry yeast, ¼ cup warm water
- In the bowl of a stand mixer, whisk together the melted butter, milk, ½ cup sugar, eggs, and orange zest. Stir in the yeast mixture. Add the flour and salt, and mix until a soft dough forms.½ cup granulated sugar, ½ cup unsalted butter, ½ cup whole milk, 2 large eggs, 1 tablespoon orange zest, 4 cups all-purpose flour, ¾ teaspoon salt
- Transfer to a floured surface and knead briefly for 1–2 minutes until smooth. Place the dough in a lightly greased bowl, cover, and let rise in a warm spot for about 2 hours, or until doubled in size.
Prepare the Filling:
- In a medium bowl, beat the softened butter, sugar, and cinnamon until fluffy. Mix in the orange zest.½ cup unsalted butter, ½ cup granulated sugar, 2 tablespoons ground cinnamon, 1 tablespoon orange zest
Roll and Fill the Dough:
- Punch down the risen dough and roll it out on a floured surface into a large rectangle about ¼ inch thick. Spread the filling evenly over the dough, leaving a ½-inch border on all sides.
- Roll the dough up tightly from the long edge to form a log. Slice the log into 1½-inch rolls using a sharp knife.
- Place the rolls swirl-side up in a greased 9×13-inch baking dish, Dutch oven, or arrange on a parchment-lined sheet for individual rolls. Cover and let rise again for 30 minutes, or until puffy.
Bake:
- Preheat the oven to 350°F (180°C).
- Bake the rolls for 25–30 minutes, or until golden brown and the centers are cooked through. Let them cool slightly before glazing.
Make the Orange Glaze:
- In a bowl, whisk together the powdered sugar, milk, orange juice, orange zest, and vanilla until smooth and pourable.3 cups powdered sugar, ¼ cup milk, 3 tablespoons fresh orange juice, 2 teaspoons orange zest, ½ teaspoon vanilla extract
- Drizzle the glaze generously over the warm rolls. Serve warm and enjoy!
Video
Notes
- Check your yeast: Make sure the yeast foams during proofing. If it doesn’t, either your yeast has expired or the water temperature was too hot or too cold.
- Use warm milk for a quicker start: Warm milk around 110°F can help activate the yeast faster and shorten the initial rise slightly.
- Switch to instant yeast for speed: Instant yeast can be mixed straight into the dry ingredients and reduces rise time by up to 20 minutes.
- Start with room-temp ingredients: Use room-temperature eggs and milk so the dough rises more evenly.
- Don’t rush the rise: Give the dough enough time to rise and double in size to achieve a soft, fluffy texture.
- Boost the filling with cream cheese: Blend softened cream cheese into the filling for a richer, tangier swirl that balances the sweetness and adds a creamy texture.
- Swap to bread flour for more chew: Using bread flour instead of all-purpose flour gives the rolls a slightly chewier bite while keeping them soft in the center.
- Keep your Dutch oven safe: Check that all parts are oven-safe (especially lid knobs), and avoid sudden temperature changes by placing it in the oven as it preheats. This enameled cast-iron Dutch oven is completely oven-safe, even its lid knob.
Nutrition
SERIOUSLY GOOD
DESSERTS!
Dessert First is a collection of 61 RECIPES to show you that you can make beautiful, impressive desserts right in your own kitchen, no matter your skill level.
Immediate eBook download. No physical book available.
Includes ad-free recipes like:
∙ Lemon Pound Cake
∙ Starbucks Cake Pops
∙ Boston Cream Pie
∙ Chocolate Mousse
∙ Matcha Tiramisu
...and much more!
Recipe Notes and Expert Tips
I’ve put together some tips that will help you get perfect Orange Rolls every time.
- Check your yeast: Make sure the yeast foams during proofing. If it doesn’t, either your yeast has expired or the water temperature was too hot or too cold.
- Use warm milk for a quicker start: Warm milk around 110°F can help activate the yeast faster and shorten the initial rise slightly.
- Switch to instant yeast for speed: Instant yeast can be mixed straight into the dry ingredients and reduces rise time by up to 20 minutes.
- Start with room-temp ingredients: Use room-temperature eggs and milk so the dough rises more evenly.
- Don’t rush the rise: Give the dough enough time to rise and double in size to achieve a soft, fluffy texture.
- Boost the filling with cream cheese: Blend softened cream cheese into the filling for a richer, tangier swirl that balances the sweetness and adds a creamy texture.
- Swap to bread flour for more chew: Using bread flour instead of all-purpose flour gives the rolls a slightly chewier bite while keeping them soft in the center.
- Keep your Dutch oven safe: Check that all parts are oven-safe (especially lid knobs), and avoid sudden temperature changes by placing it in the oven as it preheats. This enameled cast-iron Dutch oven is completely oven-safe, even its lid knob.
How to Store Leftovers
Keep leftovers in an airtight container at room temperature for 2–3 days, or refrigerate for up to 5 days. I like using this microwave and oven-safe glass container to keep them fresh and easy to warm. Reheat briefly in the microwave or oven before serving so they’re soft again.
For longer storage, you can also freeze baked, unglazed rolls for up to 2 months; just thaw them in the fridge overnight and glaze before serving. To freeze, wrap them individually in plastic wrap, then slip them into a freezer-safe bag like this to prevent freezer burn.
What to Serve With Orange Rolls
These Orange Rolls are great as part of a bigger breakfast spread. Serve them alongside eggs, bacon, or a breakfast casserole for something hearty, or keep things light with fresh fruit or yogurt to balance the sweetness.
More Easy Recipes for You to Try at Home
I’ve got plenty of other easy and delicious recipes you can try when you’re in the mood for something homemade.