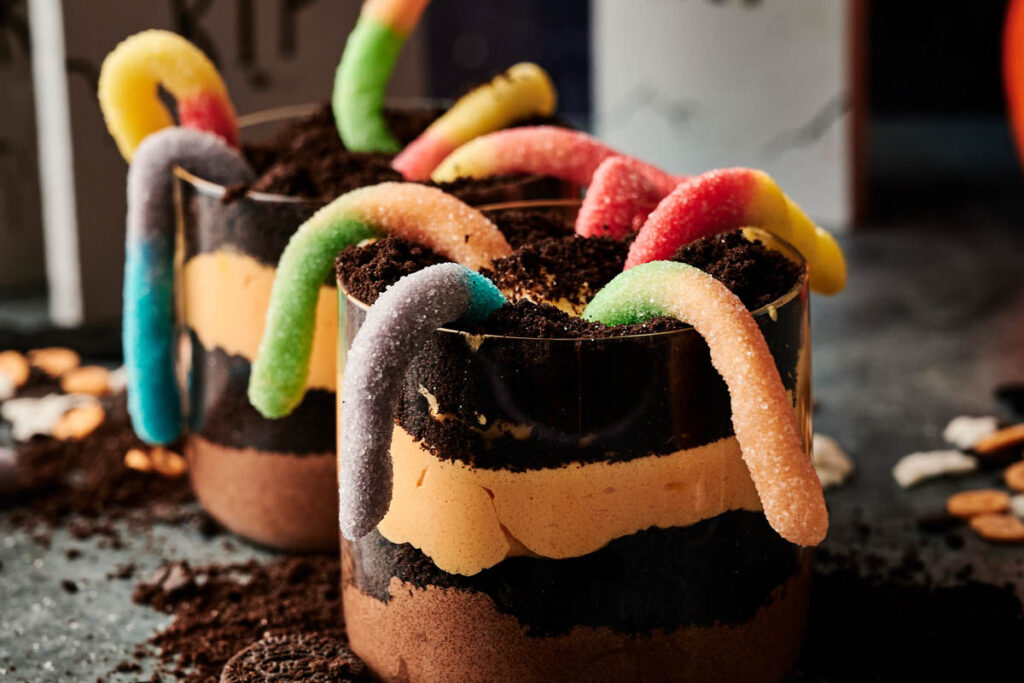
Halloween Dirt Cups are the kind of treat that instantly makes your table feel more festive without piling on extra stress. I love that they look playful and fun, and how the creamy pudding layers contrast with the crunch of crushed Oreos. There’s a little twist in the layering as well, and once you discover it, these cups go from basic to the highlight of your Halloween spread.
This post contains affiliate links. As an Amazon Affiliate, if you purchase through those links, I earn a commission. Thank you!
Halloween isn’t complete without these sweet, spooky treats, so I always make sure to have them ready, especially since the kids always go for them first. They’re one of those desserts that are gone too quickly, and I don’t blame anyone; these cups are just so good it’s hard to stop with just one. You can prep them early, keep them chilled, and you have dessert sorted out.
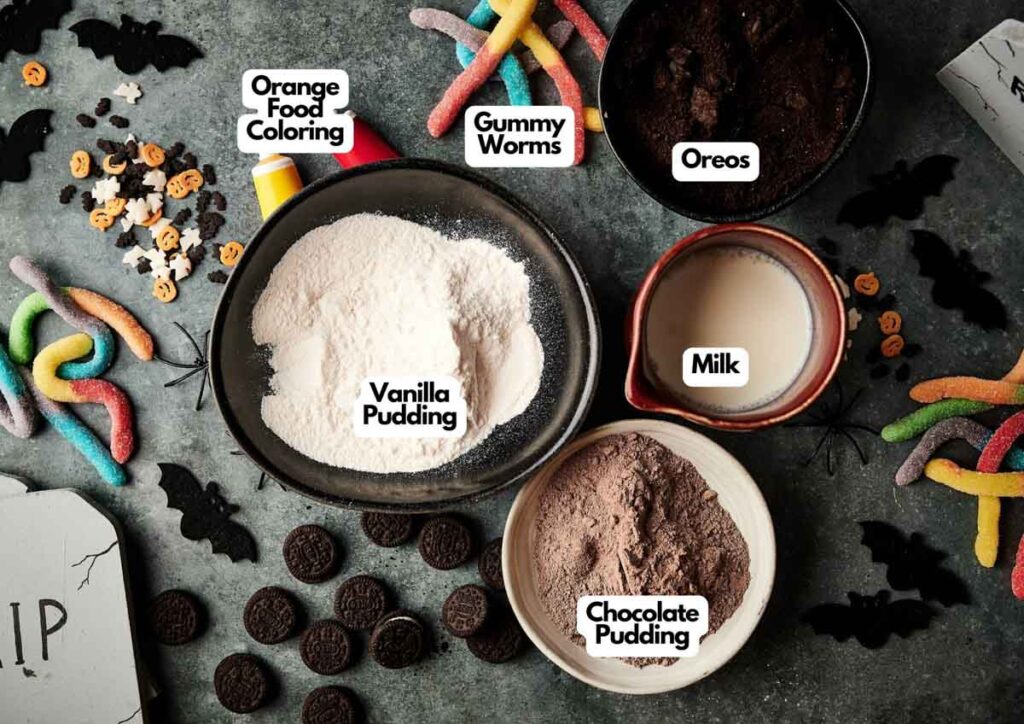
Ingredients You’ll Need
You’ll need all the ingredients shown in the photograph below.
How to Make Halloween Dirt Cups with Step-By-Step Instructions
Scroll down for the full recipe card containing a full printable recipe and measurements in both US customary and metric units.
You’ll find that putting this cute and spooky layered dessert together is easy and satisfying once you follow my simple steps.
Prepare the Pudding
Make the instant chocolate pudding mix according to the package instructions. Typically, you’ll need milk for this. Mix until smooth and well combined.
Do the same for the vanilla pudding mixture, add milk, then stir in orange food coloring until the color is bright and even. This gives you the two colors you’ll need for layering.
A hand mixer can make quick work of mixing the pudding if you’re making a big batch or short on time, and a wide glass mixing bowl like this one gives you plenty of space to stir without splashing. Make sure to scrape the sides using a rubber spatula.
Crush the Oreos
Place the Oreo cookies in a food processor and pulse until you have fine crumbs. This gives you the perfect “dirt” texture for layering. A compact food processor like this gets the crumbs super fine and makes cleanup easy.
If you don’t have a processor, put them in a ziplock bag and use a rolling pin to crush them evenly. These reusable plastic bags are thick enough to withstand cookie crushing without tearing, and this wooden rolling pin I’ve had for years is sturdy and doesn’t crack easily.
SERIOUSLY GOOD
DESSERTS!
Dessert First is a collection of 61 RECIPES to show you that you can make beautiful, impressive desserts right in your own kitchen, no matter your skill level.
Immediate eBook download. No physical book available.
Includes ad-free recipes like:
∙ Lemon Pound Cake
∙ Starbucks Cake Pops
∙ Boston Cream Pie
∙ Chocolate Mousse
∙ Matcha Tiramisu
...and much more!

Build the First Layer
Spoon chocolate pudding layer into the bottom of clear plastic cups or glass dessert cups so the bright orange and dark cookie layers show through. A cookie scoop helps portion out even layers of pudding without the mess.
I love using these trifle bowls as they let the layers really shine through, look beautiful on the table, and make them party-ready. Sprinkle a layer of crushed Oreos over the pudding to create the “dirt.” You’ll already see the layers starting to look like soil.
Add the Orange Pudding
Spoon a layer of orange vanilla pudding on top of the Oreo cookie crumbs. Follow with another sprinkle of crushed Oreos for texture and contrast. The orange really pops once it’s sandwiched between the darker layers.
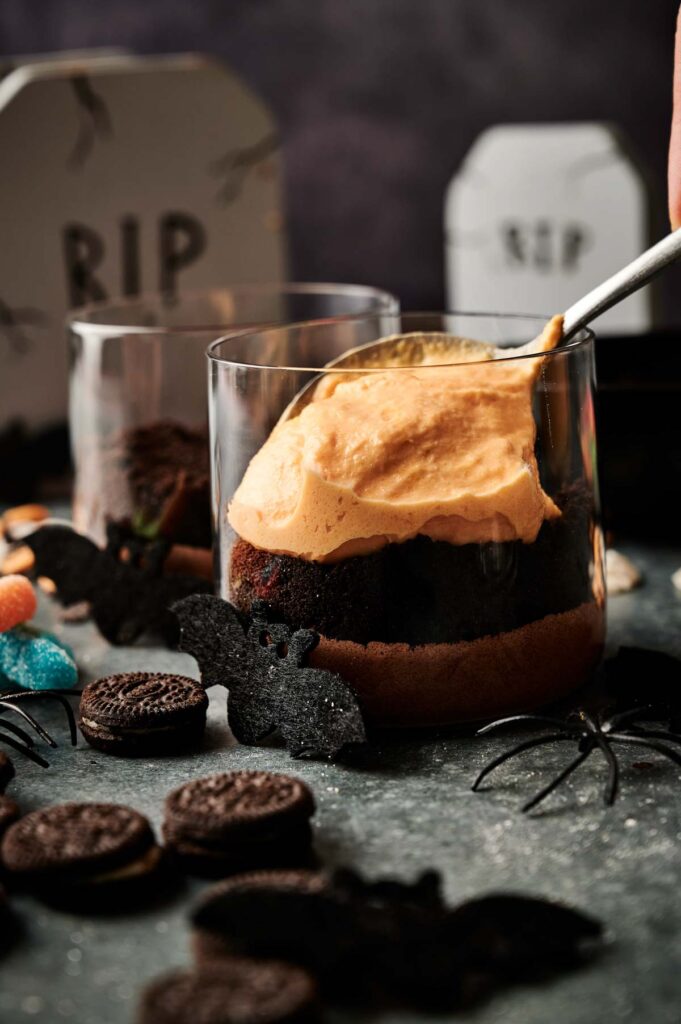
Top with More Oreos
Finish with a thick layer of crushed Oreos to cover the top completely, or add another spoonful of chocolate pudding before the Oreo crumbs if you’re using taller cups. This seals the “graveyard dirt cups” effect and makes the perfect surface for your decorations.
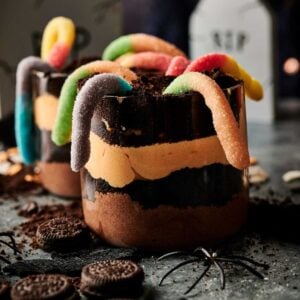
Decorate with Spooky Toppers
Press gummy worms into the top layer so they look like they’re crawling out of the dirt. Add candy eyeballs, Halloween sprinkles, or any other spooky toppers you like. This is the step where you can really have fun and let your creativity shine.
Chill and Serve
For best results, let the cups sit in the fridge for at least 30 minutes to firm up the layers of pudding and enhance the flavor. Finally, serve and enjoy!
If you’re bringing these to a Halloween potluck, you’ll want to keep them cool and prevent spills. Pack them snugly and securely into a lidded sheet cake pan like this one if you’re using short cups. An ice cream tub works, too; just leave no spaces so the cups don’t shift around.
You can layer in mini square dessert cups as well, so you can cover them, keep the worm gummies and other toppings separate in a container with compartments, and just add them once you arrive.
Since these cups have pudding, using an insulated casserole carrier helps keep them chilled and fresh until serving time.
Halloween Dirt Cups
Equipment
Ingredients
- 1 box vanilla pudding mix prepared according to package
- 1 ¼ cups milk
- Orange food coloring
- 1 box chocolate pudding mix prepared according to package
- 1 cup crushed Oreos
For Decoration:
- Gummy worms
- Candy eyes
- Halloween-themed sprinkles candy spiders, or other spooky toppers
Instructions
- Make both vanilla and chocolate pudding according to the package directions. Stir orange food coloring into the vanilla pudding until bright and evenly colored.1 box vanilla pudding mix, Orange food coloring, 1 box chocolate pudding mix, 1 ¼ cups milk
- In a clear cup or glass, spoon in a layer of chocolate pudding.
- Sprinkle crushed Oreos over the pudding.1 cup crushed Oreos
- Spoon in a layer of orange vanilla pudding, then more crushed Oreos.
- Add another spoonful of chocolate pudding, finishing with a thick layer of crushed Oreos on top.
- Place gummy worms crawling out of the “dirt” and add sugar eyes or other spooky Halloween decorations.Gummy worms, Candy eyes, Halloween-themed sprinkles
Video
Notes
- Color the vanilla pudding well: Mix in enough orange food coloring to make the pudding vibrant, since it fades a little once layered.
- Switch or customize your pudding: Replace regular chocolate pudding layers with mousse for a richer, fancier dessert, or whisk instant pudding mix with cold milk to keep it simple. You can even fold Cool Whip into the pudding if you like.
- Use other crushed cookies: Hydrox or Trader Joe’s Joe-Joe’s are also good alternatives to Oreos to create the dark soil effect. Graham crackers work too; just mix the crumbs with a little black food coloring to darken them, though the flavor will be lighter.
- Layer carefully: Spoon the puddings gently to avoid smudging the layers together and keep the colors distinct.
- Add decorations just before serving: Place gummy worms and candy eyes at the last minute so they don’t get soggy or lose their shape.
- Top with more gummy creatures: Mix gummy creatures like bats or spiders with the gummy worms on top. This booster makes the cups look extra spooky and adds more variety in candy textures.
- Make tombstones for extra topping: Press Milano cookies or a tombstone cookie upright into the top layer of dirt and write “RIP” with icing to make edible grave markers. You can also use candy tombstones for variety.
- Add Cream Topping: Feel free to add a dollop of whipped cream, Cool Whip, or whipped topping before serving for a fluffy, creamy finish if you’re feeling extra.
Nutrition
SERIOUSLY GOOD
DESSERTS!
Dessert First is a collection of 61 RECIPES to show you that you can make beautiful, impressive desserts right in your own kitchen, no matter your skill level.
Immediate eBook download. No physical book available.
Includes ad-free recipes like:
∙ Lemon Pound Cake
∙ Starbucks Cake Pops
∙ Boston Cream Pie
∙ Chocolate Mousse
∙ Matcha Tiramisu
...and much more!
Recipe Notes and Expert Tips
I’ve put together some simple tips to make sure your Halloween Dirt Cups turn out festive and fun every time.
- Color the vanilla pudding well: Mix in enough orange food coloring to make the pudding vibrant, since it fades a little once layered.
- Switch or customize your pudding: Replace regular chocolate pudding layers with mousse for a richer, fancier dessert, or whisk instant pudding mix with cold milk to keep it simple. You can even fold Cool Whip into the pudding if you like.
- Use other crushed cookies: Hydrox or Trader Joe’s Joe-Joe’s are also good alternatives to Oreos to create the dark soil effect. Graham crackers work too; just mix the crumbs with a little black food coloring to darken them, though the flavor will be lighter.
- Layer carefully: Spoon the puddings gently to avoid smudging the layers together and keep the colors distinct.
- Add decorations just before serving: Place gummy worms and candy eyes at the last minute so they don’t get soggy or lose their shape.
- Top with more gummy creatures: Mix gummy creatures like bats or spiders with the gummy worms on top. This booster makes the cups look extra spooky and adds more variety in candy textures.
- Make tombstones for extra topping: Press Milano cookies or a tombstone cookie upright into the top layer of dirt and write “RIP” with icing to make edible grave markers. You can also use candy tombstones for variety.
- Add Cream Topping: Feel free to add a dollop of whipped cream, Cool Whip, or whipped topping before serving for a fluffy, creamy finish if you’re feeling extra.
How to Store Leftovers
If you have extras, keep them chilled and covered with plastic wrap or a tight-fitting lid in the refrigerator for up to 2 to 3 days. I either cover mine with BPA-free plastic wrap or stretchable food lids, which keep the treats from absorbing fridge odors.
I don’t recommend freezing them, though, because the pudding changes texture. So, stick with storing them in the fridge and make them fresh for the best results. Also, if you’re not eating them right away, skip the toppings and only add them once you’re ready to serve.
More Easy Recipes for You to Try at Home
I’ve got plenty of other easy and fun desserts you can try next and even make with the kids, if you’re looking to keep the treats coming.