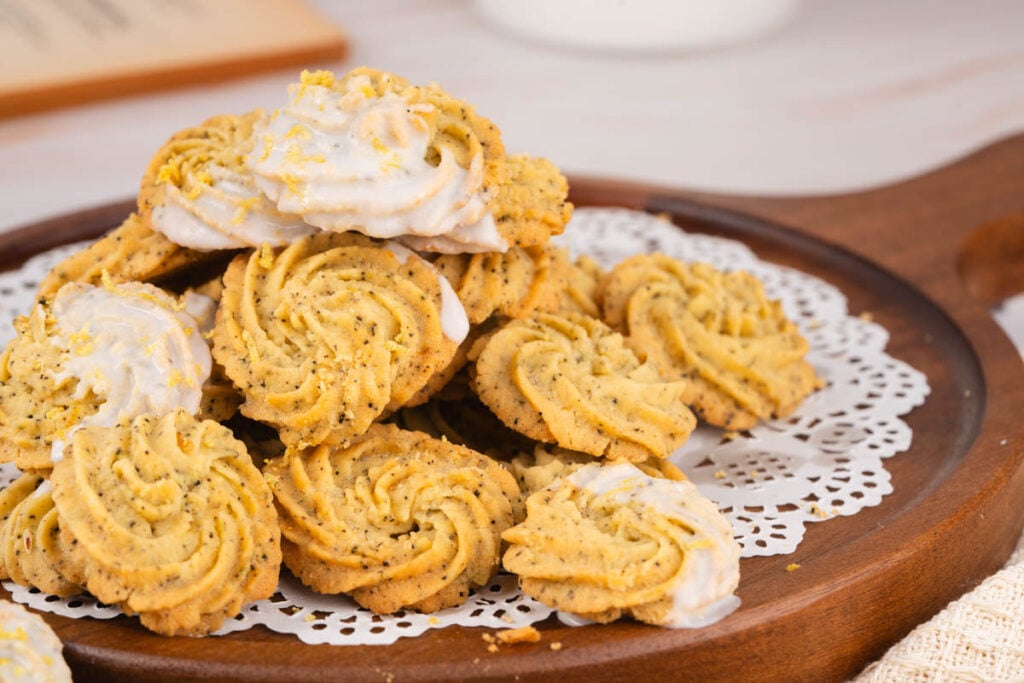
If you enjoy the floral notes of Earl Grey tea and the bright citrus flavor of fresh lemon, these Earl Grey Lemon Cookies strike a perfect balance. You get soft, buttery dough, with real tea leaves mixed in for a subtle depth that’s not overpowering. The smooth lemon glaze rounds everything out in a way that feels both cozy and refreshing.
This post contains affiliate links. As an Amazon Affiliate, if you purchase through those links, I earn a commission. Thank you!
I like baking these cookies for gatherings or slipping them into a homemade gift box. They keep well, can be made ahead, and freeze easily before glazing, which makes them great for planning ahead. If you want a treat that everyone can agree on, this one’s a must-try, is always a hit, and easy to share.
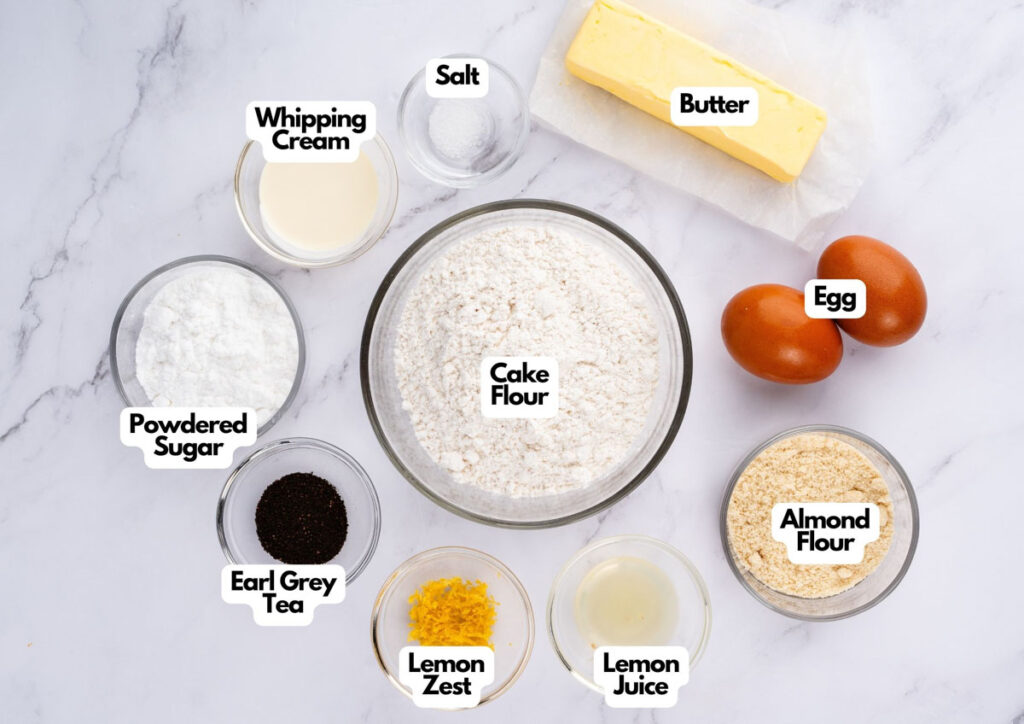
Ingredients You’ll Need
You’ll need all the ingredients shown in the photograph below.
How to Make Earl Grey Lemon Cookies with Step-By-Step Instructions
Scroll down for the full recipe card containing a full printable recipe and measurements in both US customary and metric units.
If you follow my simple steps, you’ll find making these cookies smooth and enjoyable from start to finish.
Prep the Oven and the Baking Sheet
Set your oven to 320°F (160°C) and line a baking sheet with parchment paper. This helps the cookies bake evenly and prevents sticking. I like using these pre-cut parchment sheets because they lay flat and save time—no tearing or curling edges.
Cream Butter and Sugar
In a mixing bowl, cream the softened butter, powdered sugar, and salt. Use a spatula or whisk until the mixture is smooth and no dry sugar is left.
Add Egg Yolks and Flavorings
Mix in the egg yolks one at a time, making sure each is fully blended before adding the next. Once the mixture is smooth, stir in the Earl Grey tea leaves (I use grey tea bags from Ahmad Tea), whipping cream, lemon juice, and lemon zest.
I like to run the tea leaves through a spice grinder like this one or crush them using a simple mortar and pestle so they blend more smoothly into the dough.
Keep mixing until everything is evenly combined and the mixture looks creamy and lightly speckled from the tea and zest—it should smell bright and aromatic at this point.
SERIOUSLY GOOD
DESSERTS!
Dessert First is a collection of 61 RECIPES to show you that you can make beautiful, impressive desserts right in your own kitchen, no matter your skill level.
Immediate eBook download. No physical book available.
Includes ad-free recipes like:
∙ Lemon Pound Cake
∙ Starbucks Cake Pops
∙ Boston Cream Pie
∙ Chocolate Mousse
∙ Matcha Tiramisu
...and much more!

Fold in the Dry Ingredients
Sift the cake flour and almond flour directly into the bowl. Use a gentle cut-and-lift motion to fold the flour into the wet mixture, working from the bottom of the bowl to the top. I like using this fine mesh sifter to break up any clumps and keep the texture soft.
Stop as soon as no visible dry streaks remain; overmixing can make the cookies dense instead of tender. Don’t forget to scrape along the sides and bottom to make sure everything gets mixed evenly. This flexible silicone spatula is perfect for scraping every last bit from the bowl.
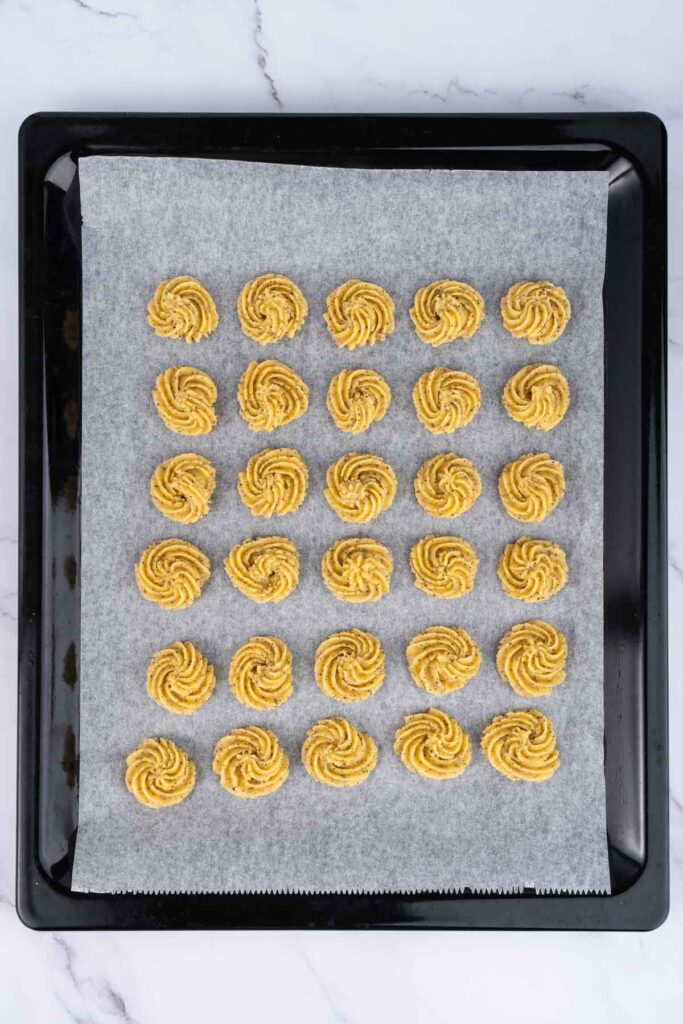
Pipe the Cookies
Spoon the cookie dough into a piping bag fitted with your preferred tip. I use this reusable piping bag set because it comes with a variety of tips and is easy to clean. My favorite for this recipe is an open star tip to get a nice rosette shape.
Pipe small rosettes or rounds onto a parchment-lined baking sheet, spacing them apart to allow for slight spreading. By the way, I use this sturdy sheet pan because it heats evenly and doesn’t warp in the oven.
Bake the Cookies
Place the tray in a preheated oven and bake for 15 minutes, or until the bottoms are lightly golden brown and the tops no longer look doughy.
After baking, let the cookies cool on the baking sheet before handling them, as they may still be too hot and delicate once out of the oven. Moving them too soon can cause them to break or lose their shape.
Once the cookies have cooled and set on the baking sheet, you can carefully transfer them to a wire rack, if you like, to help any remaining steam escape and prevent the bottoms from getting too soft. This cooling rack helps a lot with airflow, so nothing gets soggy.
Make and Apply the Lemon Glaze
While the cookies bake or cool, mix together the powdered sugar and lemon juice in a small or medium bowl until smooth and pourable. This quick mix brings out a fresh, citrus aroma that really lifts the glaze and pairs perfectly with the cookies.
Once the cookies are completely cool, drizzle the glaze over the tops or dip each one and let them set.
Finish and Serve
For a bright, citrusy finish, sprinkle a little extra lemon zest over the top while the glaze is still wet so it sticks nicely.
Enjoy your Earl Grey cookies!
If you’re giving these as a gift or bringing them to a get-together, pack them into a hard-sided food container like this one so they don’t crumble in transit. Then slide it into an insulated casserole carrier to keep them safe and fresh until you’re ready to serve or share.

Earl Grey Lemon Cookies
Equipment
Ingredients
- 4 ounces unsalted butter softened
- ⅔ cup powdered sugar
- ¼ teaspoon salt
- 2 medium size egg yolks
- 2 packets Earl Grey tea from tea bags approximately 0.15 ounce, I used Ahmad Tea brand
- 1 ¼ tablespoons whipping cream
- 2 teaspoons lemon juice
- ½ tablespoon lemon zest
- 1 cup cake flour
- ½ cup almond flour
For the Lemon Glaze:
- 4 tablespoons freshly squeezed lemon juice
- ¼ cup powdered sugar
Instructions
- Preheat the oven to 320℉ (160℃) and line a baking sheet with parchment paper.
- In a mixing bowl, combine softened butter, powdered sugar, and salt using a spatula or whisk until no white powdered sugar remains visible.4 ounces unsalted butter, ⅔ cup powdered sugar, ¼ teaspoon salt
- Add the egg yolks and mix until evenly combined.2 medium size egg yolks
- Stir in the Earl Grey tea powder, whipping cream, lemon juice, and lemon zest, mixing until well combined.2 packets Earl Grey tea from tea bags, 1 ¼ tablespoons whipping cream, 2 teaspoons lemon juice, ½ tablespoon lemon zest
- Sift cake flour and almond flour into the bowl, then gently fold it into the butter mixture using a cut-and-lift motion until just incorporated (do not overmix!).1 cup cake flour, ½ cup almond flour
- Transfer the cookie mixture to a piping bag fitted with a piping tip and pipe rosettes onto the prepared baking sheet.
- Bake for 15 minutes, then let the cookies cool completely.
- While the cookies bake, prepare the lemon glaze by mixing ¼ cup powdered sugar with 4 tablespoons lemon juice in a small bowl until thick yet pourable.4 tablespoons freshly squeezed lemon juice, ¼ cup powdered sugar
- Once the cookies have cooled, drizzle or dip them in the lemon glaze, then allow the glaze to set before serving.
Notes
- Use Room Temperature Butter: Let the butter sit out for about 30 minutes so it mixes more smoothly with the sugar and gives you a better texture. If you’re short on time, you can microwave it; just don’t let it melt completely, as that can make the dough greasy.
- Grind the Tea Leaves if Needed: Some Earl Grey blends have larger leaves, which don’t blend well into cookie dough. Give them a quick blitz in a spice grinder or crush them with a mortar and pestle.
- Add a Touch of Vanilla: For extra depth, feel free to stir in ½ teaspoon of vanilla extract with the tea and lemon ingredients. It softens the citrus and brings out the buttery flavor without overpowering the Earl Grey.
- Choose the Right Piping Tip: A star tip gives a classic rosette shape, but any medium-sized tip will work. If piping feels tricky, you can also shape the dough with a spoon.
- Bake a Test Cookie: If you’re unsure about size or texture, bake one cookie first to test how it spreads and adjust oven time if needed.
- Cool Completely Before Glazing: Let the cookies cool all the way so the glaze sticks properly and doesn’t run off.
- Adjust the Glaze Consistency: If it’s too thin, add a little powdered sugar. If it’s too thick, a few extra drops of lemon juice will loosen it up.
- Let the Glaze Set Fully: Give them time to dry before storing or stacking to keep the glaze from smudging.
Nutrition
SERIOUSLY GOOD
DESSERTS!
Dessert First is a collection of 61 RECIPES to show you that you can make beautiful, impressive desserts right in your own kitchen, no matter your skill level.
Immediate eBook download. No physical book available.
Includes ad-free recipes like:
∙ Lemon Pound Cake
∙ Starbucks Cake Pops
∙ Boston Cream Pie
∙ Chocolate Mousse
∙ Matcha Tiramisu
...and much more!
Recipe Notes and Expert Tips
I’ve pulled together some helpful tips to make sure your cookies turn out just the way you want them to.
- Use Room Temperature Butter: Let the butter sit out for about 30 minutes so it mixes more smoothly with the sugar and gives you a better texture. If you’re short on time, you can microwave it; just don’t let it melt completely, as that can make the dough greasy.
- Grind the Tea Leaves if Needed: Some Earl Grey blends have larger leaves, which don’t blend well into cookie dough. Give them a quick blitz in a spice grinder or crush them with a mortar and pestle.
- Add a Touch of Vanilla: For extra depth, feel free to stir in ½ teaspoon of vanilla extract with the tea and lemon ingredients. It softens the citrus and brings out the buttery flavor without overpowering the Earl Grey.
- Choose the Right Piping Tip: A star tip gives a classic rosette shape, but any medium-sized tip will work. If piping feels tricky, you can also shape the dough with a spoon.
- Bake a Test Cookie: If you’re unsure about size or texture, bake one cookie first to test how it spreads and adjust oven time if needed.
- Cool Completely Before Glazing: Let the cookies cool all the way so the glaze sticks properly and doesn’t run off.
- Adjust the Glaze Consistency: If it’s too thin, add a little powdered sugar. If it’s too thick, a few extra drops of lemon juice will loosen it up.
- Let the Glaze Set Fully: Give them time to dry before storing or stacking to keep the glaze from smudging.
How to Store Leftovers
Store any leftover cookies in an airtight container at room temperature for up to 5 days. If you want to keep them longer, you can freeze them before glazing. I like this locking glass container because it seals well and keeps everything fresh without absorbing odors.
Just place them in a freezer-safe container with parchment between layers, and freeze for up to 2 months. I use this freezer-safe storage container because I know it won’t crack or warp and fits easily into tight spaces—tried and tested!
If you don’t have parchment, wrap the cookies individually or in small stacks with plastic wrap to prevent sticking. I usually go with this BPA-free wrap because it clings tightly and keeps the cookies from drying out.
When you’re ready to enjoy them, let the cookies thaw at room temperature, then add the lemon glaze after they’ve defrosted.
What to Serve With Earl Grey Lemon Cookies
These cookies go perfectly with a cup of hot tea—especially Earl Grey or English Breakfast—but they’re just as good with coffee or even a cold glass of milk or soda for something more casual.
For a quick and fun dessert idea, try serving them with a scoop of lemon-flavored or vanilla ice cream. They’re also a great addition to a cookie tray alongside classic shortbread cookies, biscotti, or sugar cookies.
More Easy Recipes for You to Try at Home
I’ve got plenty more simple and delicious recipes that you can make in your own kitchen without much fuss: