If you want a taste of Dubai’s luxury right at your home without needing a flight ticket, this Dubai Chocolate recipe is the answer! It’s a candy bar but with Middle Eastern roots and a homemade feel that sets it apart from anything store-bought. If you’ve got a skillet, some pistachio, kataifi, tahini, and a sweet tooth, you’re already halfway there.

This post contains affiliate links. As an Amazon Affiliate, if you purchase through those links, I earn a commission. Thank you!
My friends always think I buy this chocolate, but I don’t—I make it in my kitchen! Everyone loves this pistachio chocolate treat, whether it’s for a holiday spread or weekend hangout. There are rarely leftovers, and if there are any, you can store them at room temperature, in the fridge, or even in the freezer.
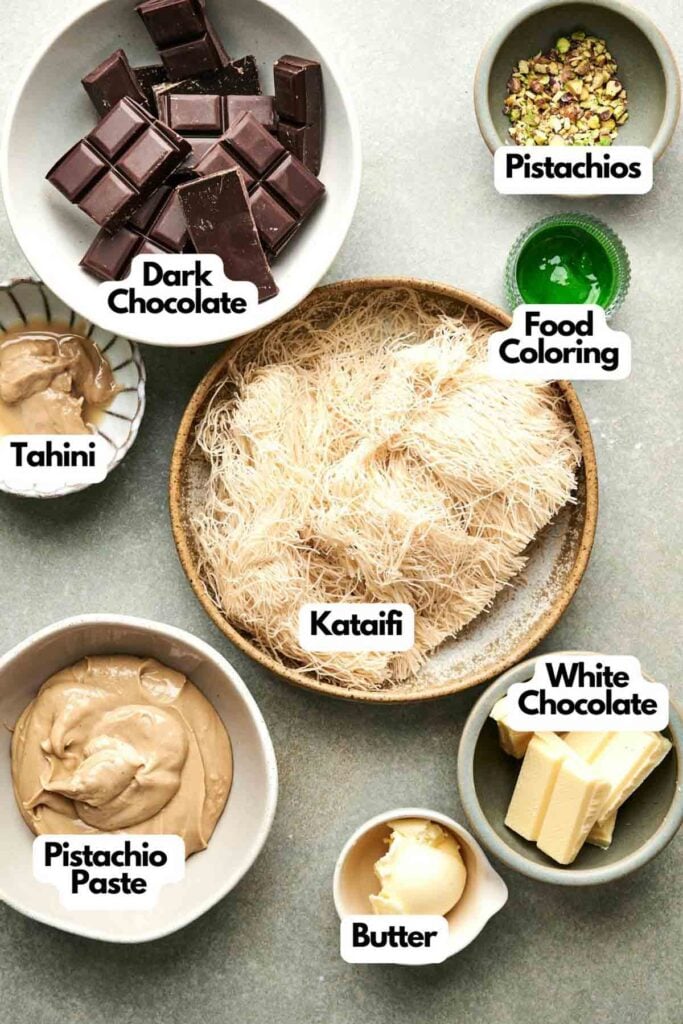
Ingredients You’ll Need
You’ll need all the ingredients shown in the photograph below.
How to Make Dubai Chocolate with Step-By-Step Instructions
Scroll down for the full recipe card containing a full printable recipe and measurements in both US customary and metric units.
Making this chocolate recipe is easy—just follow my simple instructions below.
Toast the Kataifi Dough
Start by chopping the kataifi into small pieces—it’ll toast more evenly that way. Melt the butter in a nonstick skillet over medium-low heat.
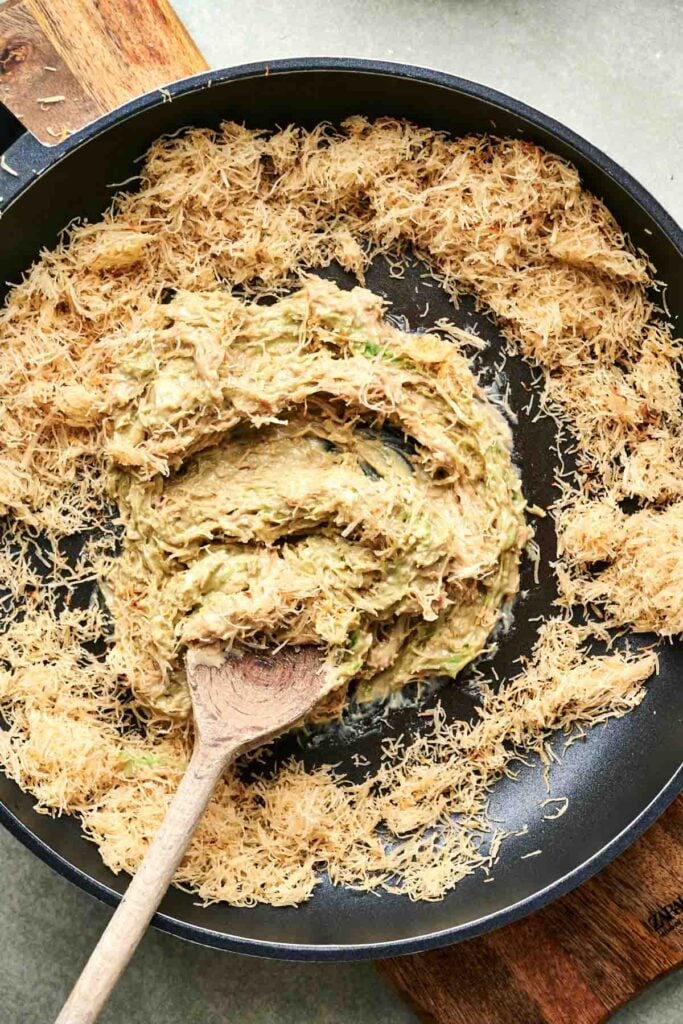
Add the kataifi and toast it, stirring occasionally for 5-10 minutes, or until golden brown and crisp. Set it aside to cool.
Mix the Pistachio Filling
In a bowl, stir together the toasted kataifi, pistachio paste, and tahini. Mix until everything is well combined and the mixture sticks together slightly—you want it to be easy to press into your mold without falling apart.
Melt the Chocolate
Melt the dark and white chocolate separately using a double boiler. If you’re adding the green food coloring, mix it into the white chocolate once it’s fully melted.
Stir until the color is even and smooth.
SERIOUSLY GOOD
DESSERTS!
Dessert First is a collection of 61 RECIPES to show you that you can make beautiful, impressive desserts right in your own kitchen, no matter your skill level.
Immediate eBook download. No physical book available.
Includes ad-free recipes like:
∙ Lemon Pound Cake
∙ Starbucks Cake Pops
∙ Boston Cream Pie
∙ Chocolate Mousse
∙ Matcha Tiramisu
...and much more!

Assemble the Layers
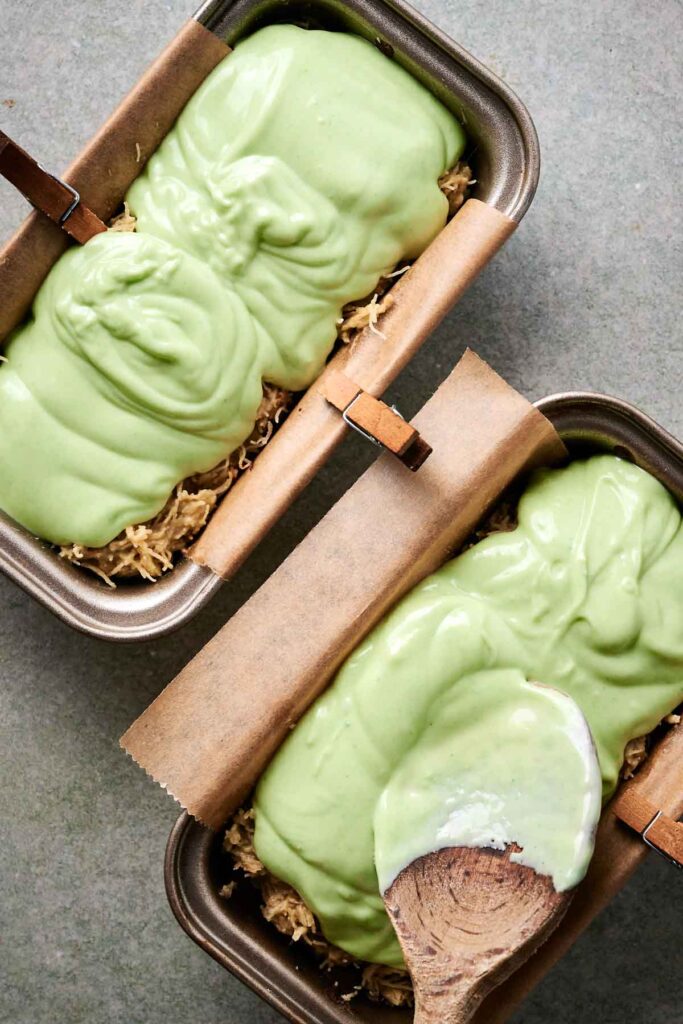
Line two small baking molds (around 3 x ½ inches) with parchment paper and spoon a layer of melted dark chocolate into the bottom of each mold. Press the pistachio filling on top of the chocolate, spreading it evenly and firmly to the edges.
Finish with a layer of the green-tinted white chocolate, smoothing it over the top.
Set and Slice
Sprinkle chopped pistachios over the top while the chocolate is still soft. Let everything set completely, either at room temperature or in the fridge.
Once firm, lift the chocolate out of the molds and slice into ½-inch thick pieces. Finally, serve and enjoy!

Dubai Chocolate
Ingredients
- 2 cups kataifi
- 1 tablespoon butter
- 1 cup pistachio paste
- 2 tablespoons tahini
- 2 cups dark chocolate
- ⅓ cup white chocolate
- 3 drops food coloring green
- ¼ cup pistachios chopped
Instructions
- Chop the kataifi dough into small pieces.2 cups kataifi
- In a nonstick skillet over medium-low heat, melt the butter. Add the chopped kataifi and cook, stirring occasionally, until it turns golden brown, about 5-10 minutes. Remove from heat and let it cool.1 tablespoon butter
- In a mixing bowl, combine the toasted kataifi with the pistachio paste and tahini, stirring until well incorporated. Set aside.1 cup pistachio paste, 2 tablespoons tahini
- Melt the dark chocolate and white chocolate separately, preferably using a double boiler. Stir the green food coloring into the melted white chocolate until evenly blended.2 cups dark chocolate, ⅓ cup white chocolate, 3 drops food coloring
- Line two small baking molds (around 3 x ½ inches) with parchment paper. Drizzle the melted dark chocolate inside each mold, creating an even base.
- Evenly press the kataifi and pistachio mixture into the molds, ensuring it spreads to the edges. Pour the green-tinted white chocolate over the top, then sprinkle with chopped pistachios.¼ cup pistachios
- Let the chocolate set completely before gently removing it from the molds. Slice into ½-inch thick pieces and serve.
Video
Notes
- Prep the kataifi right: Chop it into short strands before toasting so it blends smoothly into the filling.
- Watch your heat: Keep the burner on medium-low and stir often so the kataifi doesn’t burn—it can go from golden to burnt fast.
- Cool it down: Let the toasted kataifi cool fully before mixing it with the paste, or the filling can get greasy.
- Pick quality pistachio paste: Go for one that’s 100% pistachios (no added sugar or oils) for the richest flavor.
- Tahini is non-negotiable: It gives the filling a nutty depth that balances out all the chocolate.
- Melt chocolate gently: Chocolate can turn grainy if overheated, so it’s best to use a double boiler for indirect heat and to prevent scorching.
- Line your molds well: Parchment paper makes it easy to lift the chocolate out once solid without breaking.
- Chill before slicing: Give it enough time to fully set so you get clean, sharp cuts when slicing.
Nutrition
SERIOUSLY GOOD
DESSERTS!
Dessert First is a collection of 61 RECIPES to show you that you can make beautiful, impressive desserts right in your own kitchen, no matter your skill level.
Immediate eBook download. No physical book available.
Includes ad-free recipes like:
∙ Lemon Pound Cake
∙ Starbucks Cake Pops
∙ Boston Cream Pie
∙ Chocolate Mousse
∙ Matcha Tiramisu
...and much more!
Recipe Notes and Expert Tips
I’ve made this treat a few times now, and these tips will help yours turn out just right from start to finish.
- Prep the kataifi right: Chop it into short strands before toasting so it blends smoothly into the filling.
- Watch your heat: Keep the burner on medium-low and stir often so the kataifi doesn’t burn—it can go from golden to burnt fast.
- Cool it down: Let the toasted kataifi cool fully before mixing it with the paste, or the filling can get greasy.
- Pick quality pistachio paste: Go for one that’s 100% pistachios (no added sugar or oils) for the richest flavor.
- Tahini is non-negotiable: It gives the filling a nutty depth that balances out all the chocolate.
- Melt chocolate gently: Chocolate can turn grainy if overheated, so it’s best to use a double boiler for indirect heat and to prevent scorching.
- Line your molds well: Parchment paper makes it easy to lift the chocolate out once solid without breaking.
- Chill before slicing: Give it enough time to fully set so you get clean, sharp cuts when slicing.
How to Store Leftovers
If you have any leftovers, store slices in an airtight container for 2-3 weeks at room temperature between 15–20°C (59–68°F), and make sure you keep them somewhere dark.
If your kitchen runs warm, you can also keep them chilled in the fridge for up to 2 months. Cover each slice tightly with plastic wrap or aluminum foil before storing in the container, as you don’t want your chocolate to absorb moisture or odors from other food in the fridge.
For even longer storage, freezing is also a safe option. Just make sure they’re sealed tightly with plastic wrap or aluminum foil in a freezer-safe bag or container. You can also layer the already wrapped chocolate with wax or parchment paper for extra protection. They can last for several months in the freezer (that’s around 3-5 months).
When you’re ready to enjoy it again, let the frozen slices thaw overnight in the fridge. Keep in mind that the kataifi layer may soften slightly once defrosted, but the flavor will still hold up. Once they’re out of the fridge, allow them first to return to room temperature before unwrapping so they don’t get damp from condensation.
What to Serve With Dubai Chocolate
Dubai chocolate goes really well with a small cup of strong coffee, like espresso or Turkish coffee, or a cup of mint tea. You can also slice it smaller and serve it alongside a spread of nuts, dates, and other sweets for a dessert platter with a Middle Eastern feel.
More Easy Recipes for You to Try at Home
I’ve got more easy treats and dessert ideas that work great alongside this one or when you want something equally fun to make, so make sure to check them out!