Baking Day of the Dead Cookies for Día de los Muertos is one of those traditions I look forward to. Every time I make them, I can’t wait for that first bite of soft, buttery cookie under the layer of crisp, sugary icing. You’ll love how they come together in such a festive way with bold and bright colors, with a simple step that makes decorating smoother and more fun.

This post contains affiliate links. As an Amazon Affiliate, if you purchase through those links, I earn a commission. Thank you!
These holiday cookies are my favorite way to bring life to celebrations, whether it’s Day of the Dead, a Halloween party, or a fall potluck with neighbors and friends. I like that I can bake them ahead and even decorate these colorful desserts with the kids. You can also store them or freeze a batch so they’re ready whenever the occasion comes up.
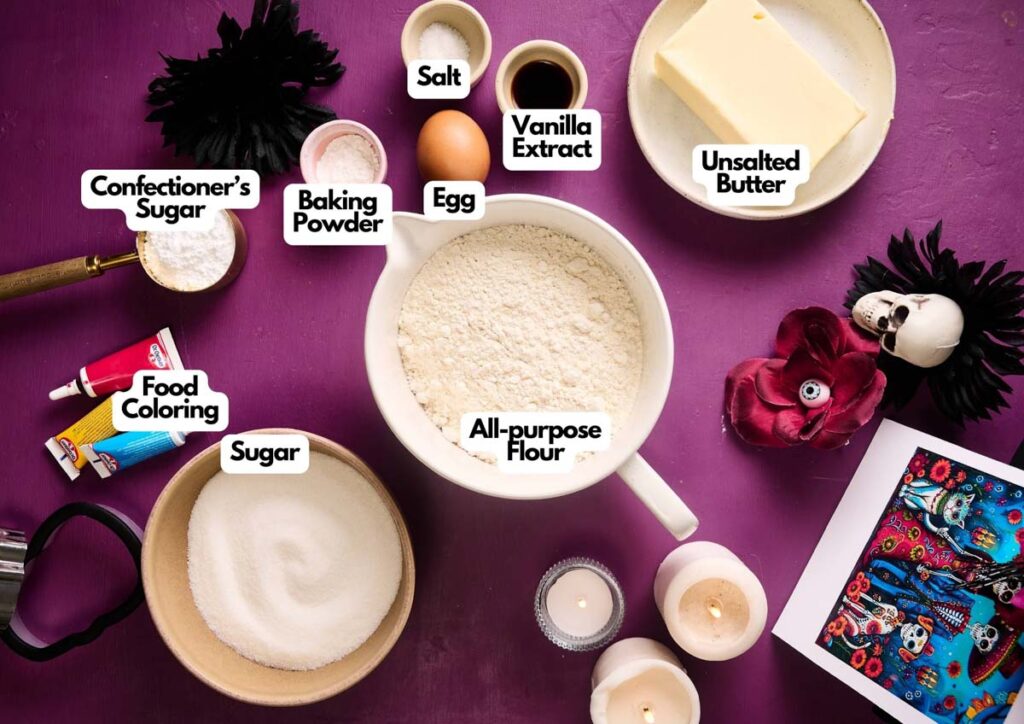
Ingredients You’ll Need
You’ll need all the ingredients shown in the photograph below.
How to Make Day of the Dead Cookies with Step-By-Step Instructions
Scroll down for the full recipe card containing a full printable recipe and measurements in both US customary and metric units.
Follow my simple instructions and you’ll find it easy to make cookies that are both tasty and beautiful to decorate.
Mix the dry ingredients
In a medium bowl, whisk together the flour, baking powder, and salt until they’re well combined without any clumps. This gives your cookies a consistent texture when they bake.
A non-slip mixing bowl is perfect for this as it stays in one place as you whisk. I like using a balloon whisk for even mixing, as it really helps break up lumps of flour.
SERIOUSLY GOOD
DESSERTS!
Dessert First is a collection of 61 RECIPES to show you that you can make beautiful, impressive desserts right in your own kitchen, no matter your skill level.
Immediate eBook download. No physical book available.
Includes ad-free recipes like:
∙ Lemon Pound Cake
∙ Starbucks Cake Pops
∙ Boston Cream Pie
∙ Chocolate Mousse
∙ Matcha Tiramisu
...and much more!

Cream butter and sugar
In a large bowl, beat the butter and sugar until it’s light and fluffy. A hand mixer makes this part much easier and quicker. I also use a silicone spatula to scrape down the sides of the bowl, so nothing goes to waste.
Add the egg and vanilla extract, making sure everything is well blended and smooth. Be careful not to overmix at this stage, since that can make the cookies tough instead of keeping them light and tender.
Form and chill the dough
Slowly add the dry mixture into the wet mixture until a dough forms. Going slowly helps you avoid overmixing and keeps the cookies from turning out dense, while also preventing a flour cloud from making a mess and making sure everything blends together more easily and evenly.
Divide the dough into two portions so they’re easier to work with later. Then, wrap each in plastic wrap to keep them from drying out. This dough cutter is super handy when dividing sticky dough cleanly, and this BPA-free plastic wrap clings tightly and holds up in the fridge.
Chill for at least 1 hour so the dough firms up and holds its shape better when baked. After chilling, tear a few small pieces to check its texture; it should be firm but easy to roll out.
Prepare the baking sheets
Preheat your oven to 350°F (180°C) and line baking sheets with parchment paper to prevent sticking and make cleanup a breeze.
I use these rimmed baking sheets because they hold their shape and bake evenly, and precut parchment sheets as they save time and fit perfectly on standard pans.
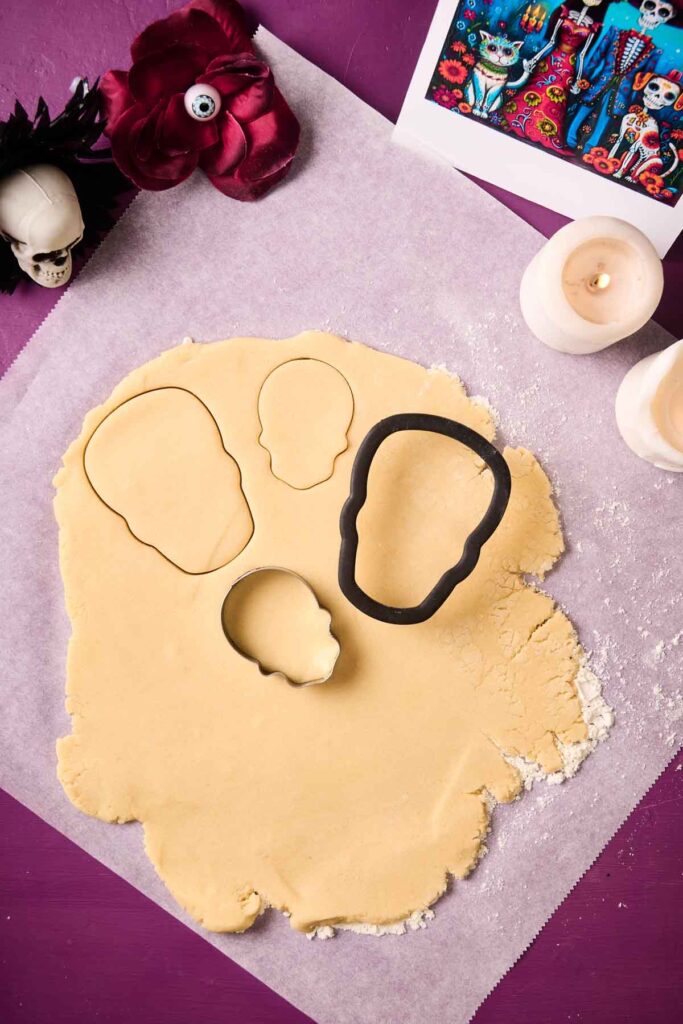
Roll and carve out skull shapes
Now, take out the chilled dough and roll it on your lightly floured work surface to about ¼ inch thick. This thickness keeps the cookies sturdy enough for decorating while still giving them a tender bite.
I roll on my large wood cutting board so cleanup is easy and my counters stay clean. A nonstick rolling pin like this one helps prevent sticking and gives you smooth, even dough every time.
Using a skull-shaped cookie cutter, cut out skull cookies and arrange them on the prepared sheets. Make sure to leave a little space between each one to give them room to spread slightly as they bake and keep their shapes clean and defined.
I use this Halloween-themed cookie-cutter set; it comes with nine different shapes (including a skull) and carves out easily with a gentle press, giving the cookies neat edges.
Bake and cool completely
Bake for 8–10 minutes, or until the edges are just starting to turn golden. Let the cookies cool completely before moving on to the decorating step. If you start decorating right away, the warm cookies will melt the icing, so patience here really pays off.
I transfer the cookies to a nonstick cooling rack to let them cool fully and evenly without sticking or getting soggy on the bottom.
Make your royal icing
In a bowl, whisk together the confectioner’s sugar with two tablespoons of milk or water until it comes together. I like using a spout mixing bowl for this, which makes it a lot easier to pour or portion out icing without a mess.
Add liquid slowly, a little at a time, until the icing is smooth and spreadable but still thick enough to hold its shape once piped. Going gradually helps you avoid icing that’s too runny, which can make decorating messy.
Divide into smaller bowls and tint each with your favorite gel food colors. Having a set of small glass prep bowls like this is great, especially if you’re using several different colors.
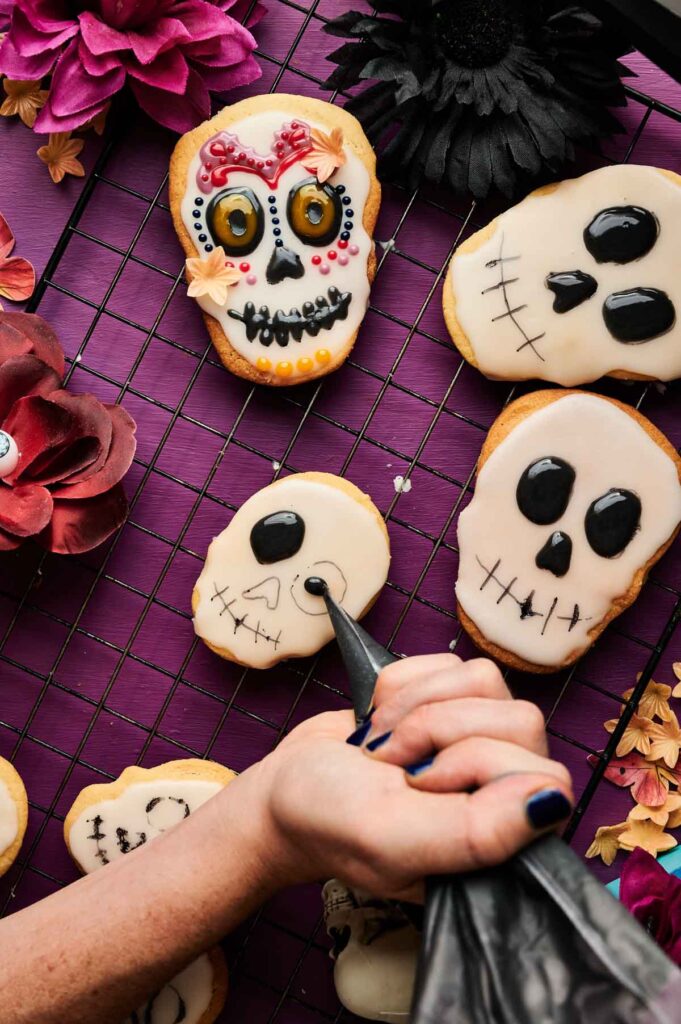
Decorate the cookies
Here comes the fun part: letting your creativity shine and bringing your Dead of the Day cookies to life. Once they’re fully cooled, start with lightly sketching the skull shape. This will serve as your guide once you pipe the icing. I use these edible pens; they’re easy to use with dual tips.
You could also create a base layer first, by carefully dipping or coating the top of the cookie with the icing using a small spoon. That means waiting until it’s set and dry before you can draw the outlines, though. If you have time, going this route is totally fine.
Now, with piping bags, decorate the cookies with colorful sugar skull designs following the outlines you’ve sketched. This reusable piping bag is durable and comes with many piping tips, including one with a super small opening, which is perfect for this recipe.
If you don’t have that kind of piping tip, snip very tiny openings at the tips of your piping bags so you can create intricate details like dots and swirls and fill the eyes and noses more easily. I always keep a pair of sharp kitchen shears nearby to cut precise tips on the bags neatly.
Let the icing firm up
After decorating, wait until the icing’s fully set and firm before serving or storing so the design stays intact. Trust me; you don’t want your decorating efforts to go to waste.
Finally, once they’re all nice and set, serve, share with your family and friends, and enjoy!
If you’re bringing them to a party or potluck, pack them well in a hard-sided container to keep the cookies and their decorated tops intact. Also, use an insulated carrier to help prevent condensation or any damage from temperature changes while transporting them.

Day of the Dead Cookies
Equipment
Ingredients
For the Cookies:
- 3 cups all-purpose flour
- 1 teaspoon baking powder
- ½ teaspoon salt
- 1 cup unsalted butter softened
- 1 cup sugar
- 1 large egg
- 1 teaspoon vanilla extract
For the Royal Icing:
- 2 cups confectioner’s sugar
- 2–4 tablespoons milk or water add gradually until thick but spreadable
- Gel food coloring assorted colors
Instructions
- In a medium bowl, whisk together the flour, baking powder, and salt.3 cups all-purpose flour, 1 teaspoon baking powder, ½ teaspoon salt
- In a large bowl, beat the butter and sugar until light and fluffy. Mix in the egg and vanilla extract.1 cup unsalted butter, 1 cup sugar, 1 large egg, 1 teaspoon vanilla extract
- Gradually add the dry ingredients to the wet mixture until a dough forms.
- Divide the dough in half, wrap in plastic wrap, and chill in the refrigerator for at least 1 hour.
- Preheat oven to 350°F (180°C). Line baking sheets with parchment paper.
- On a lightly floured surface, roll out the dough to about ¼ inch thick. Cut out skull shapes with a cookie cutter and place on the prepared sheets.
- Bake for 8–10 minutes, or until the edges are lightly golden. Allow cookies to cool completely before decorating.
- In a bowl, whisk confectioner’s sugar with 2 tablespoons of milk or water. Add more liquid gradually until icing is smooth and slightly thick. Divide icing into small bowls and tint each with different gel food coloring.2 cups confectioner’s sugar, 2–4 tablespoons milk or water, Gel food coloring
- Create a base layer by coating the top of the cookie with the icing using a small spoon. Pipe or spread colorful designs onto each cookie to resemble traditional sugar skulls. Allow icing to set before serving.
Video
Notes
- Measure your flour correctly: Use the spoon and level method so your dough doesn’t end up too heavy. A measuring cup helps you get accurate measurements every time, and an offset spatula works well for leveling and removing any excess flour.
- Add warmth or bright flavor: Mix in a bit of cinnamon with the dough mixture to give the sugar cookies a warm, spiced note. Or stir in orange zest for a fresh citrus lift that balances the sweetness. This zester makes it easy to zest citrus right into your bowl.
- Use orange blossom water: Swap in orange blossom water for the vanilla extract to give the cookies a delicate floral aroma that’s traditional in Mexican baking.
- Stick to gel colors: They’re more vibrant and won’t thin your icing the way liquid food coloring can. They also make it easier to control the shade; you can build up bold tones gradually without making the icing runny.
- Play with decorations: You can add little, colorful candies to the cookies after icing as a finishing touch and for a bit of crunch. Press them in gently while the icing is still soft, so they stick well. To prevent smudging the icing, use food tweezers like this.
- Give icing time to set: Let cookies dry for at least 2–4 hours at room temperature before stacking or packing them up. For the cleanest results, especially if the icing is thick, let them sit overnight so the designs stay sharp. The wait’s going to be worth it, I swear.
- Dry the icing faster: If you’re a little short on time or in a rush and want to speed up the drying process, use your electric fan and set your cookies on the wire rack. Make sure to stick with a gentle breeze and monitor the icing as it dries to prevent forming tiny bubbles.
Nutrition
SERIOUSLY GOOD
DESSERTS!
Dessert First is a collection of 61 RECIPES to show you that you can make beautiful, impressive desserts right in your own kitchen, no matter your skill level.
Immediate eBook download. No physical book available.
Includes ad-free recipes like:
∙ Lemon Pound Cake
∙ Starbucks Cake Pops
∙ Boston Cream Pie
∙ Chocolate Mousse
∙ Matcha Tiramisu
...and much more!
Recipe Notes and Expert Tips
I’ve pulled together some helpful tips to help your cookies turn out great from start to finish.
- Measure your flour correctly: Use the spoon and level method so your dough doesn’t end up too heavy. A measuring cup helps you get accurate measurements every time, and an offset spatula works well for leveling and removing any excess flour.
- Add warmth or bright flavor: Mix in a bit of cinnamon with the dough mixture to give the sugar cookies a warm, spiced note. Or stir in orange zest for a fresh citrus lift that balances the sweetness. This zester makes it easy to zest citrus right into your bowl.
- Use orange blossom water: Swap in orange blossom water for the vanilla extract to give the cookies a delicate floral aroma that’s traditional in Mexican baking.
- Stick to gel colors: They’re more vibrant and won’t thin your icing the way liquid food coloring can. They also make it easier to control the shade; you can build up bold tones gradually without making the icing runny.
- Play with decorations: You can add little, colorful candies to the cookies after icing as a finishing touch and for a bit of crunch. Press them in gently while the icing is still soft, so they stick well. To prevent smudging the icing, use food tweezers like this.
- Give icing time to set: Let cookies dry for at least 2–4 hours at room temperature before stacking or packing them up. For the cleanest results, especially if the icing is thick, let them sit overnight so the designs stay sharp. The wait’s going to be worth it, I swear.
- Dry the icing faster: If you’re a little short on time or in a rush and want to speed up the drying process, use your electric fan and set your cookies on the wire rack. Make sure to stick with a gentle breeze and monitor the icing as it dries to prevent forming tiny bubbles.
How to Store Leftovers
Store your decorated cookies in an airtight container with wax paper between layers to prevent sticking. They’re best kept at room temperature if you’re serving them within 3–5 days, but you can also place them in the refrigerator for up to 2 weeks.
These glass airtight containers keep them fresh and stack nicely in the fridge. If you’d like to prepare them ahead, you can freeze the baked, undecorated cookies for up to 3 months. Just wrap each one in plastic wrap before freezing and thaw them completely before decorating.
I use freezer bags that seal well and keep them from drying out or breaking in the freezer. A freezer-safe container like this one lets you stack the wrapped cookies and also helps protect them against freezer burn.
Decorated cookies can also be frozen, but only once the icing is fully hardened and dry. You can use a freezer-safe glass container like this to freeze them in a single layer, as condensation during thawing or pressure from stacking can cause colors to bleed or designs to chip.
More Easy Recipes for You to Try at Home
Whether you’re baking for the season or craving a sweet treat, looking for an easy recipe that can feel both timeless and festive, I’ve got plenty more ideas that’ll have you covered: