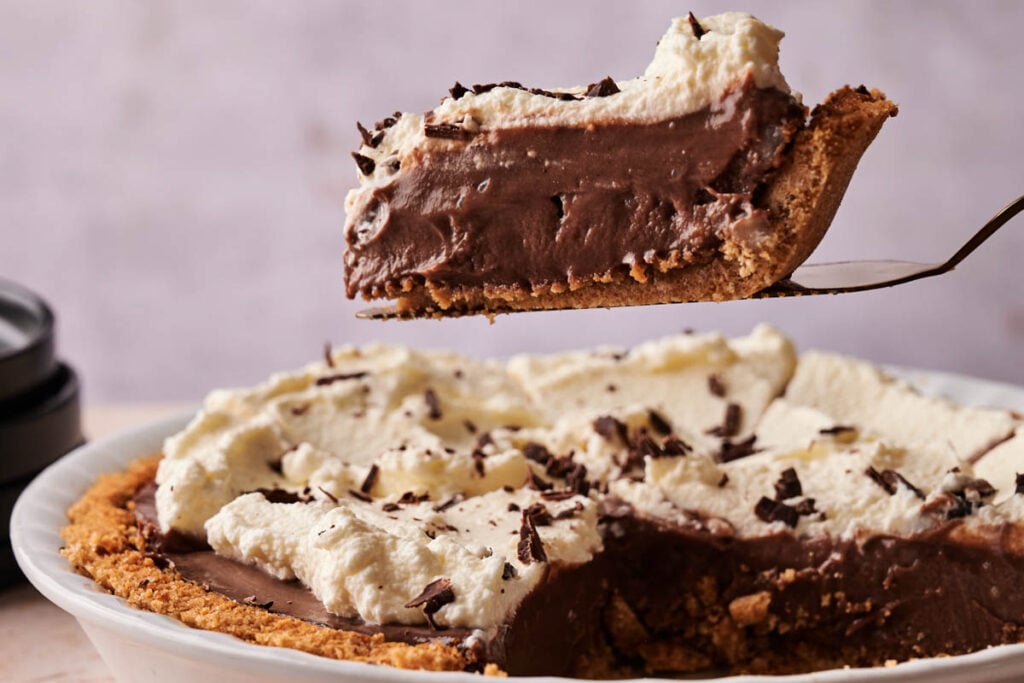
Chocolate Cream Pie is my go-to when I want a dessert that’s cold, creamy, and slices like a dream. The filling is smooth and deeply chocolaty, with a texture that melts in your mouth perfectly. I always use one simple step that takes it to the next level without extra effort. Once it chills and sets, that first slice is pure magic.
This post contains affiliate links. As an Amazon Affiliate, if you purchase through those links, I earn a commission. Thank you!
I make this Chocolate Cream Pie when I need something crowd-pleasing. I can prep it ahead of time without juggling last-minute steps. It’s perfect for family dinners, potlucks, or gatherings since it stores well in the fridge and can be frozen if needed.
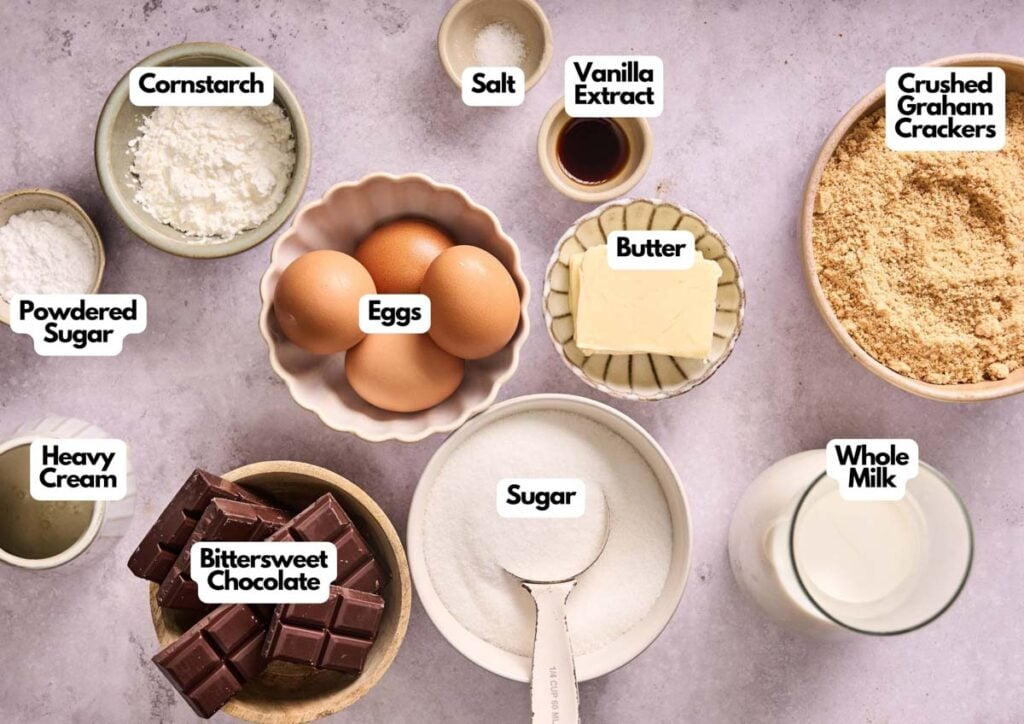
Ingredients You’ll Need
You’ll need all the ingredients shown in the photograph below.
How to Make Chocolate Cream Pie with Step-By-Step Instructions
Scroll down for the full recipe card containing a full printable recipe and measurements in both US customary and metric units.
You’ll find that making this chocolate cream pie is simple if you follow my easy steps; each step builds flavor and texture without overcomplicating the process.
Make the Crust
Preheat your oven to 350°F (180°C). In a medium bowl, combine the crushed graham crackers, granulated sugar, and melted butter until well mixed. I like using this batter bowl with a spout and handle for prep like this because it gives a better grip while mixing.
Press the mixture into a 9-inch pie dish to make sure it’s compact and reaches up the sides, creating a sturdy crust that holds together once baked. This ceramic pie pan cooks evenly and looks great, making it ideal for serving directly at the table. To pack the crust down nicely, I enjoy using my wooden tamper as it shapes more precisely and saves time.
Bake for 8–10 minutes, then remove and allow it to cool completely.
Cook the Chocolate Filling
In a medium saucepan over medium heat, whisk the milk, heavy cream, sugar, cornstarch, and salt to warm. I always grab this nonstick saucepan with double spouts for easy pouring with less mess.
In a separate small bowl, beat the egg yolks and slowly mix in a small amount of the warm milk mixture to temper them. I keep a glass prep bowl on hand for jobs like this; it’s just the right size, and the clear sides let me keep an eye on the texture as I whisk. For whisking, I use this stainless steel balloon whisk because it blends the yolks smoothly with no splashing.
Slowly pour the tempered yolks back into the saucepan, stirring constantly to avoid curdling. Continue cooking for about 5 minutes, or just until the mixture has thickened.
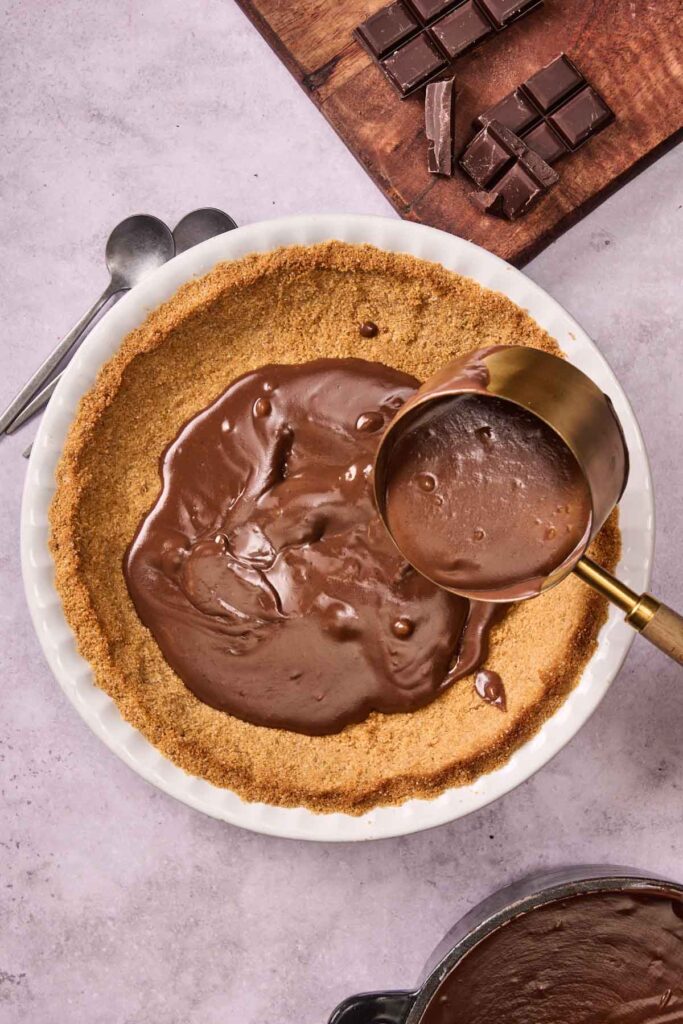
Remove from the heat and add the chopped chocolate, butter, and vanilla. Let them melt slightly, then stir gently to create a glossy, rich filling. I often reach for this silicone spatula here; it scrapes the pan clean without leaving any chocolate behind.
SERIOUSLY GOOD
DESSERTS!
Dessert First is a collection of 61 RECIPES to show you that you can make beautiful, impressive desserts right in your own kitchen, no matter your skill level.
Immediate eBook download. No physical book available.
Includes ad-free recipes like:
∙ Lemon Pound Cake
∙ Starbucks Cake Pops
∙ Boston Cream Pie
∙ Chocolate Mousse
∙ Matcha Tiramisu
...and much more!

Assemble and Chill the Pie
Transfer the warm filling into the cooled pie crust and level the top with a spatula. I like using this offset spatula since it spreads perfectly and keeps things intact.
Press a piece of plastic wrap directly onto the surface to prevent skin from forming. This BPA-free one clings well and doesn’t crinkle or lift during chilling.
Refrigerate for at least 4 hours or overnight, allowing the filling to set fully. Otherwise, the pie may be too soft to slice cleanly.
Whip the Cream Topping
In a chilled mixing bowl, whip the heavy cream, powdered sugar, and vanilla extract until soft peaks form. I usually pop my stainless steel mixing bowl in the freezer for a few minutes; it helps the texture stay firm and silky.
Once the pie is set, spread the whipped cream on top with a spoon or pipe so that it holds its shape and doesn’t melt into the filling. I love using a reusable piping bag for this because it creates beautiful swirls, perfect for those who want a more polished finish on top.
Garnish and Serve
Add chocolate chips, shavings, or a dusting of cocoa powder, if desired. Slice and serve straight from the fridge. When I want picture-perfect slices, I grab this cake cutter and server as it glides neatly through everything without crumbling the crust.
Now enjoy your rich and creamy Chocolate Cream Pie!
If you’re bringing this to a holiday gathering, I pack it in a pie container like this one to prevent it from shifting or getting damaged during transit. To keep it cool along the way, I slide the whole container into this round insulated pie carrier, which holds temperature well and doesn’t take up too much space.
Chocolate Cream Pie
Equipment
Ingredients
For the crust:
- 1½ cups crushed graham crackers
- ¼ cup granulated sugar
- 6 tablespoons melted butter
For the chocolate filling:
- 2½ cups whole milk
- ½ cup heavy cream
- ⅔ cup granulated sugar
- ¼ cup cornstarch
- ¼ teaspoon salt
- 4 egg yolks
- 6 oz bittersweet chocolate chopped
- 2 tablespoons unsalted butter
- 1 teaspoon vanilla extract
For the whipped cream topping:
- 1 cup heavy whipping cream
- 2 tablespoons powdered sugar
- 1 teaspoon vanilla extract
- Chocolate shavings or a dusting of cocoa powder for garnish (optional)
Instructions
Make the crust:
- Preheat the oven to 350°F (180°C).
- In a bowl, combine crushed graham crackers, sugar, and melted butter until evenly moistened.1½ cups crushed graham crackers, ¼ cup granulated sugar, 6 tablespoons melted butter
- Press the mixture firmly into the bottom and sides of a 9-inch pie dish. Bake for 8–10 minutes, then set aside to cool completely.
Make the chocolate filling:
- In a medium saucepan, whisk together milk, heavy cream, sugar, cornstarch, and salt over medium heat until warm.2½ cups whole milk, ½ cup heavy cream, ⅔ cup granulated sugar, ¼ cup cornstarch, ¼ teaspoon salt
- In a small bowl, beat the egg yolks. Gradually whisk in about ½ cup of the warm milk mixture to temper the eggs.4 egg yolks
- Slowly pour the tempered yolks back into the saucepan, stirring constantly. Continue to cook, stirring, until the mixture thickens—about 5 minutes. Remove from heat and stir in the chopped chocolate, butter, and vanilla until smooth and glossy.6 oz bittersweet chocolate, 2 tablespoons unsalted butter, 1 teaspoon vanilla extract
Assemble and chill:
- Pour the warm chocolate filling into the cooled crust and smooth the top.
- Cover with plastic wrap, pressing it directly onto the surface to prevent a skin from forming. Refrigerate for at least 4 hours or overnight until fully set.
Whip the cream topping:
- In a chilled bowl, beat the heavy cream, powdered sugar, and vanilla until soft peaks form. Spread or pipe over the chilled pie.1 cup heavy whipping cream, 2 tablespoons powdered sugar, 1 teaspoon vanilla extract
Finish and serve:
- Garnish with chocolate shavings or a dusting of cocoa powder if desired. Slice and enjoy!Chocolate shavings or a dusting of cocoa powder
Video
Notes
- Crumb Texture: Crush graham crackers into fine crumbs for a base that presses cleanly and stays intact after baking. If you’re using Oreo cookies instead, make sure they’re processed to the same delicate texture.
- Tempering Eggs: Add the hot milk slowly to the yolks while whisking. This prevents the eggs from scrambling and gives the pie its smooth texture.
- Even Heating: Stir the milk mixture constantly and don’t rush it. Gentle heating ensures the cornstarch activates properly and the custard thickens without lumps.
- Glossy Finish: Stir in the chocolate and butter while the mixture is still hot for the best shine and flavor. The residual heat is enough to melt everything evenly.
- Smooth Filling: If you’re concerned about any curdled bits, pour the filling through a fine mesh strainer.
- Plastic Wrap Trick: Pressing the wrap directly onto the surface prevents the thick skin from forming on top of the chocolate layer.
- Chilling Time: Don’t skip the chill. At least 4 hours are needed for clean slices and proper texture. Overnight is even better as it brings out the chocolate flavor even more.
- Cream Stability: Make sure your bowl and beaters are cold when whipping the cream. It helps the cream whip faster and hold its shape longer, especially if you’re piping it on top.
Nutrition
SERIOUSLY GOOD
DESSERTS!
Dessert First is a collection of 61 RECIPES to show you that you can make beautiful, impressive desserts right in your own kitchen, no matter your skill level.
Immediate eBook download. No physical book available.
Includes ad-free recipes like:
∙ Lemon Pound Cake
∙ Starbucks Cake Pops
∙ Boston Cream Pie
∙ Chocolate Mousse
∙ Matcha Tiramisu
...and much more!
Recipe Notes and Expert Tips
I’ve made this pie more times than I can count, and these tips will help you avoid common pitfalls and get the best results.
- Crumb Texture: Crush graham crackers into fine crumbs for a base that presses cleanly and stays intact after baking. If you’re using Oreo cookies instead, make sure they’re processed to the same delicate texture. I use this food processor; it turns everything into uniform crumbs fast, with less cleanup.
- Tempering Eggs: Add the hot milk slowly to the yolks while whisking. This prevents the eggs from scrambling and gives the pie its smooth texture.
- Even Heating: Stir the milk mixture constantly and don’t rush it. Gentle heating ensures the cornstarch activates properly and the custard thickens without lumps.
- Glossy Finish: Stir in the chocolate and butter while the mixture is still hot for the best shine and flavor. The residual heat is enough to melt everything evenly.
- Smooth Filling: If you’re concerned about any curdled bits, pour the filling through a fine mesh strainer. It’s a small step that makes a big difference, so I often use my fine mesh strainer because it catches every lump without slowing me down.
- Plastic Wrap Trick: Pressing the wrap directly onto the surface prevents the thick skin from forming on top of the chocolate layer.
- Chilling Time: Don’t skip the chill. At least 4 hours are needed for clean slices and proper texture. Overnight is even better as it brings out the chocolate flavor even more.
- Cream Stability: Make sure your bowl and beaters are cold when whipping the cream. It helps the cream whip faster and hold its shape longer, especially if you’re piping it on top.
How to Store Leftovers
Store leftover chocolate cream pie in the refrigerator, loosely covered with plastic wrap or foil, to maintain its freshness. This heavy-duty aluminum foil is ideal for covering dishes without tearing or slipping around in the fridge. It will stay fresh for up to 4 days.
If I’m storing slices instead of the whole pie, I keep them in these airtight glass containers since they seal well and stack easily without squishing the topping.
You can also freeze it, though the texture may change slightly once thawed. For best results, freeze the pie after it has fully set but before adding the whipped cream. Wrap it tightly in plastic wrap, followed by a layer of foil, and freeze for up to 3 months. Thaw overnight in the fridge, then add fresh whipped cream just before serving.
More Easy Recipes for You to Try at Home
I’ve got plenty of other desserts and crowd-pleasers that are just as easy and satisfying, perfect for your next gathering or just a night in.