Whenever I bake a batch of Chicken Pinwheels, I know they’re going to be the first thing gone, because they’re that irresistible. You get warm, cheesy, bacon-filled goodness in every swirl, but what really makes them special is a quick little trick that keeps them neat, golden, and just the right texture inside and out.

This post contains affiliate links. As an Amazon Affiliate, if you purchase through those links, I earn a commission. Thank you!
For me, game day isn’t complete without a few trays of these Chicken Pinwheels coming out of the oven. They’re the kind of easy appetizer and snack that feels made for sharing, fitting right in at tailgate parties, picnics, and Christmas. You can also make them ahead, keep them chilled or frozen, and bake or reheat when you’re ready to serve.
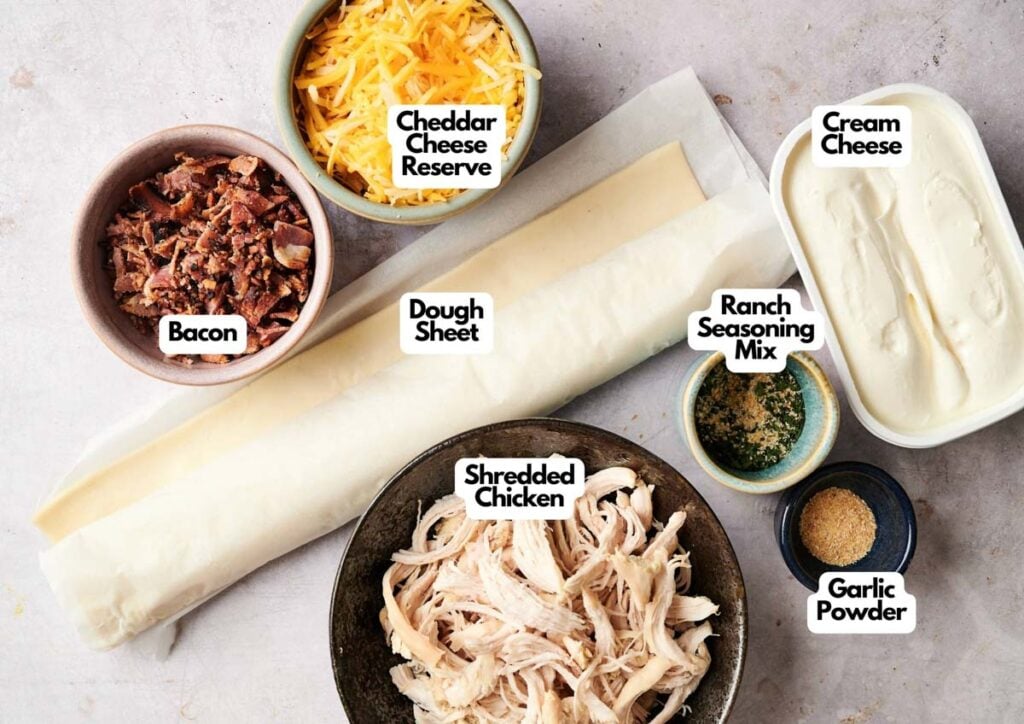
Ingredients You’ll Need
You’ll need all the ingredients shown in the photograph below.
How to Make Chicken Pinwheels with Step-By-Step Instructions
Scroll down for the full recipe card containing a full printable recipe and measurements in both US customary and metric units.
You’ll find making these Chicken Pinwheels simple and fun with simple ingredients if you follow my easy step-by-step instructions.
Prepare the Filling
In a large mixing bowl, combine the softened cream cheese, ranch seasoning mix, garlic powder, crumbled bacon, 1 cup of shredded cheddar cheese, and the cooked shredded chicken.
A large glass mixing bowl like this makes prep easier and gives you room to stir without ingredients spilling over. If you’re shredding cooked chicken yourself, a meat shredder makes the job faster and keeps your hands clean.
Stir everything together until the mixture is smooth, creamy, and evenly blended. It should be thick enough to spread easily without slipping off the dough.
Assemble the Dough
Unroll the crescent roll dough onto a flat surface and press the seams together to form a single sheet. You’ll want it smooth, so the filling spreads evenly. Spoon the chicken-cream cheese mixture over the dough and spread it out in an even layer.
You can use a silicone spatula to spread without tearing the dough sheet. A multi-purpose spread tool is another great option to glide the filling evenly without snagging the dough. Leave about a 1-inch border around the edges to help keep the filling inside when you roll it up.

Roll and Chill
Starting from the long side, roll the dough tightly into a log, keeping the filling tucked in as you go. Then, seal the seams by pressing them together well to prevent the filling from oozing out while baking.
Wrap the log in plastic wrap to hold its shape, then refrigerate for about 30 minutes. You’ll want a roll of BPA-free wrap on hand that clings well and keeps the dough tightly sealed as it chills. This quick chill step helps firm up the dough, making it easier to slice into perfect rounds later.
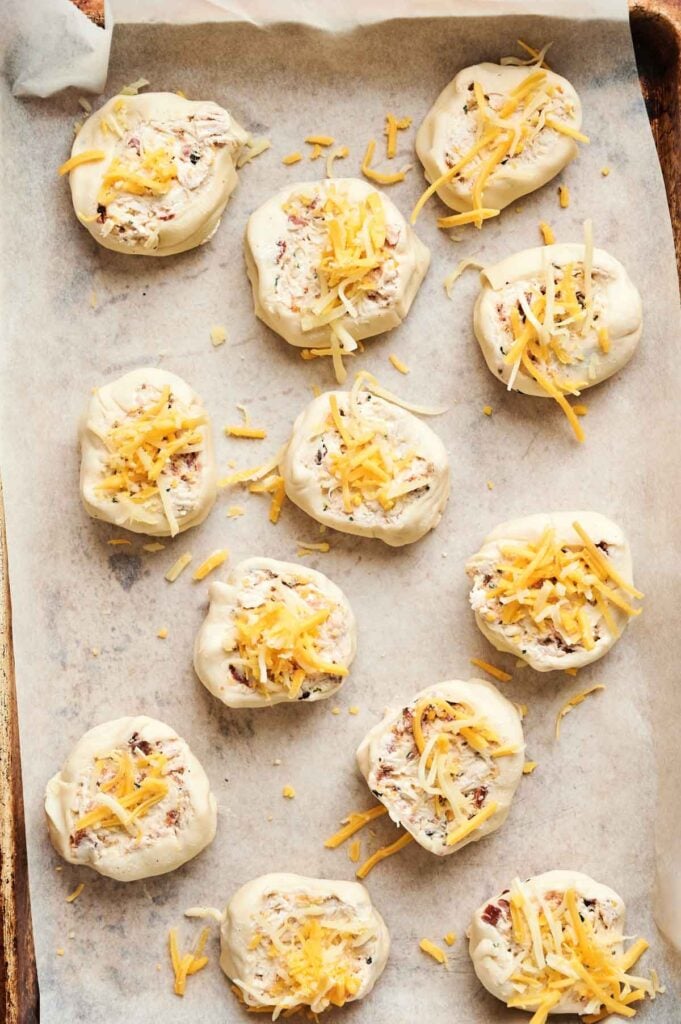
Slice and Arrange
Once chilled, unwrap the dough and use a sharp knife (ideally serrated) to slice it into 1-inch pieces or thick rounds. Try gentle sawing motions so you don’t flatten them or squish the filling out. This serrated knife is perfect for clean cuts through the dough and filling without tearing.
Arrange the slices about 2 inches apart on a baking sheet lined with parchment paper. I use this rimmed baking sheet, which heats evenly and gives the pinwheels room to rise. Layering with precut parchment paper keeps the bottoms from sticking and makes cleanup quick.
Sprinkle the tops of each one with the remaining ½ cup of shredded cheddar cheese for an extra cheesy finish. This box grater is super handy for freshly grating your own cheddar for more flavor and melt.
Bake Until Golden
Bake the pinwheels in a preheated oven at 350°F (180°C) for 15 to 18 minutes, or until golden brown and slightly crispy around the edges. You’ll know they’re ready when your kitchen smells amazing and the cheese on top has melted beautifully.
Let them cool slightly before topping with fresh chopped chives and serving. A good pair of herb scissors makes it quick and easy to snip fresh chives directly over the pinwheels.
Enjoy warm!
If you’re bringing these to a party, potluck, or picnic, you’ll want something sturdy to carry them. This hard-sided container keeps the pinwheels protected and from getting crushed. An insulated carrier like this one keeps them perfectly warm without drying them out.

Chicken Pinwheels
Equipment
- Stand mixer or
Ingredients
- 1 sheet of crescent roll dough
- 6 slices bacon cooked until crispy and crumbled
- 1 cup shredded cooked chicken
- 6 ounces cream cheese softened
- ½ teaspoon garlic powder
- 1 ½ cups shredded cheddar cheese reserve ½ cup for topping
- 2 tablespoons ranch seasoning mix
- Fresh chives chopped (for garnish)
Instructions
- Preheat the oven to 350°F (180°C). Line a baking sheet with parchment paper.
- In a bowl, mix together the softened cream cheese, ranch seasoning, garlic powder, crumbled bacon, 1 cup of cheddar cheese, and shredded chicken until well combined.6 slices bacon, 1 cup shredded cooked chicken, 6 ounces cream cheese, ½ teaspoon garlic powder, 1 ½ cups shredded cheddar cheese, 2 tablespoons ranch seasoning mix
- Unroll the crescent dough and press the seams together to make one even sheet. Spread the chicken mixture evenly over the dough, leaving about a 1-inch border around the edges.1 sheet of crescent roll dough
- Starting from the long side, roll the dough into a tight log. Wrap it in plastic wrap and refrigerate for 30 minutes to firm up.
- Remove the log from the refrigerator, unwrap, and slice into 1-inch thick rounds using a serrated knife. Arrange the slices about 2 inches apart on the prepared baking sheet. Sprinkle the tops with the remaining ½ cup of cheddar cheese.
- Bake for 15 to 18 minutes, or until golden brown and crispy.
- Allow to cool slightly, then garnish with fresh chives before serving.Fresh chives
Notes
- Get the perfect mix: Let the cream cheese sit out at room temperature first, so it blends more easily into the filling. You can also use a stand mixer or a hand mixer to blend everything smoothly, quickly, and evenly.
- Cook the bacon until crisp: Use fully cooked, crispy bacon and let it cool before crumbling to keep the filling from becoming greasy. You want crunchy bacon bits, not chewy ones, so the texture stands out in every bite.
- Choose your chicken wisely: Use rotisserie chicken for extra flavor and convenience, or try canned chicken if you’re making these pinwheels at the last minute. You can also cook and shred chicken breast if you prefer a fresher, firmer texture.
- Add extra flavor: Mix in chopped green onions for brightness and stir in finely diced jalapeños for a gentle kick of heat that pairs well with the creamy filling. This sharp chef’s knife makes chopping feel effortless.
- Lighten things up: Swap turkey bacon for a leaner option that still crisps nicely, or stick with traditional bacon for a richer flavor.
- Line your baking sheet: Parchment paper makes cleanup easy and helps make sure nothing sticks to the pan.
- Chill before slicing: Don’t skip this; it keeps the pinwheels from losing their shape and makes clean, even cuts possible.
- Add garnish last: Sprinkle the fresh chives right before serving so they stay bright and flavorful. Waiting until the end keeps their color vibrant and prevents them from wilting against the warm, cheesy pinwheels, giving your dish that fresh, just-made look.
Nutrition
Recipe Notes and Expert Tips
I’ve picked up a few tricks from making these countless times, and they make all the difference between good crack chicken pinwheels and great ones.
- Get the perfect mix: Let the cream cheese sit out at room temperature first, so it blends more easily into the filling. You can also use a stand mixer or a hand mixer to blend everything smoothly, quickly, and evenly.
- Cook the bacon until crisp: Use fully cooked, crispy bacon and let it cool before crumbling to keep the filling from becoming greasy. You want crunchy bacon bits, not chewy ones, so the texture stands out in every bite.
- Choose your chicken wisely: Use rotisserie chicken for extra flavor and convenience, or try canned chicken if you’re making these pinwheels at the last minute. You can also cook and shred chicken breast if you prefer a fresher, firmer texture.
- Add extra flavor: Mix in chopped green onions for brightness and stir in finely diced jalapeños for a gentle kick of heat that pairs well with the creamy filling. This sharp chef’s knife makes chopping feel effortless.
- Lighten things up: Swap turkey bacon for a leaner option that still crisps nicely, or stick with traditional bacon for a richer flavor.
- Line your baking sheet: Parchment paper makes cleanup easy and helps make sure nothing sticks to the pan.
- Chill before slicing: Don’t skip this; it keeps the pinwheels from losing their shape and makes clean, even cuts possible.
- Add garnish last: Sprinkle the fresh chives right before serving so they stay bright and flavorful. Waiting until the end keeps their color vibrant and prevents them from wilting against the warm, cheesy pinwheels, giving your dish that fresh, just-made look.
How to Store Leftovers
If you’ve got leftovers, store them in an airtight container in the fridge for up to 3 days. These glass food storage containers help keep the pinwheels fresh and prevent any fridge odors from seeping in.
Freezing isn’t recommended, as the cream cheese filling and dough can lose their smooth texture once thawed. To serve, pop them back into the oven at 350°F or in an air fryer until warm, golden, and crisp again; they’ll taste freshly baked.
What to Serve With Chicken Pinwheels
This chicken pinwheels recipe is a great appetizer that pairs beautifully with ranch dressing, honey mustard, or buffalo sauce for dipping. It’s perfect as a school snack for kids or as a quick lunch, alongside a fresh green salad or a cozy bowl of soup.
These cheesy, savory pinwheel sandwiches also make a great addition to party platters with meatballs, cheese dip, and pretzel bites when you want something crowd-pleasing.
More Easy Recipes for You to Try at Home
I love easy party bites like these, and if you’re looking for more warm, cheesy, and crowd-pleasing recipes for your next party, try a few of my favorites below.