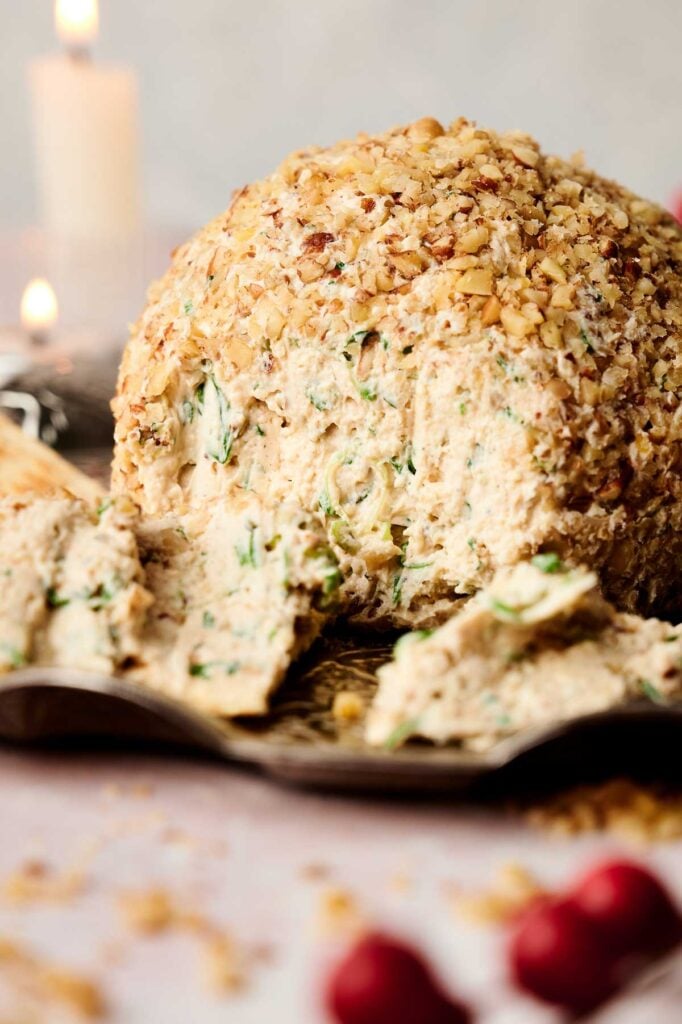
If you’re looking for a recipe that’s easy to prepare, deliciously satisfying, and a guaranteed crowd-pleaser, this Cheese Ball has your name on it. Combining a creamy cheese base with sharp cheddar, a touch of spice, and a crunchy nut coating, it’s the ultimate snack for gatherings or a cozy night in.
This post contains affiliate links. As an Amazon Affiliate, if you purchase through those links, I earn a commission. Thank you!
I love making this cheese ball because it’s ridiculously quick to throw together, even on a busy day. In just about 10 minutes, I can have it prepped and ready to chill—no complicated steps or special tools needed. It’s always a crowd-pleaser at family gatherings or holiday parties, and I know I can count on it to impress without taking up too much of my time.
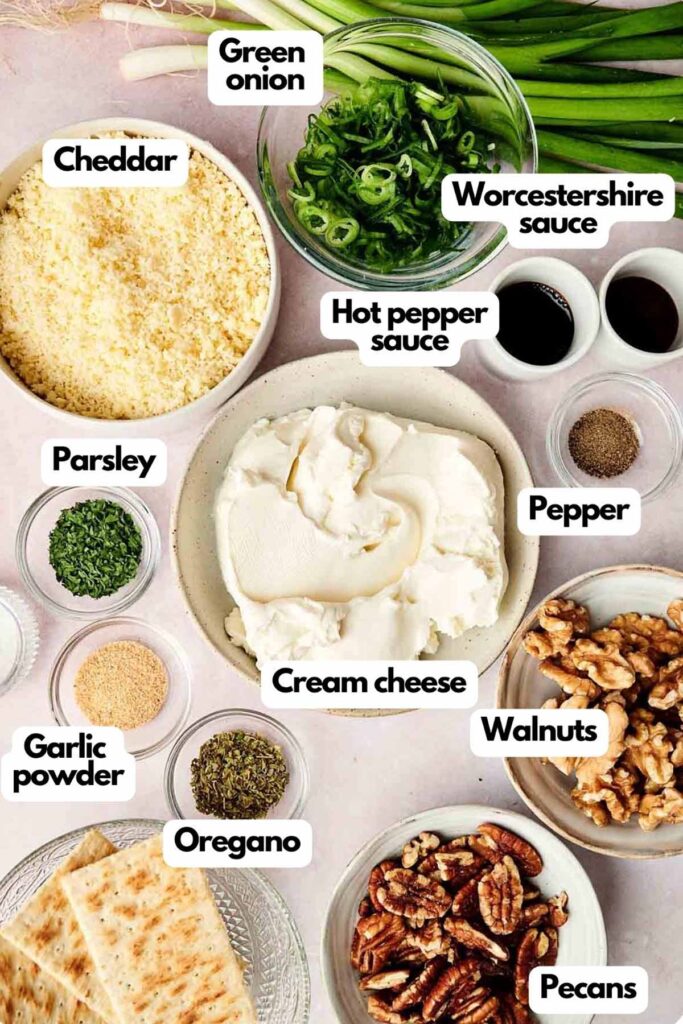
Ingredients You’ll Need
You’ll need all the ingredients shown in the photograph below.
How to Make a Cheese Ball with Step-By-Step Instructions
A complete printable recipe and the measurements in both US customary and metric are available in the recipe card below.
This recipe couldn’t be easier to make, and the results? Absolutely worth it! Follow these steps, and you’ll have a creamy, crunchy cheese ball ready to impress.
Mix Everything Together
Start by placing the softened cream cheese into a medium-sized bowl. Using a spoon or hand mixer, beat the cream cheese until it’s smooth and fluffy.
Add the grated cheddar cheese, vegetarian Worcestershire sauce, chopped green onions, hot sauce, garlic powder, parsley, oregano, and black pepper. Mix until all the ingredients are evenly combined into a creamy mixture.
Shape It Into a Ball
Use a spatula to scrape the cheese mixture into the center of the bowl. Lightly grease your hands with a bit of oil or butter, then shape the mixture into a ball.
Don’t worry about it being perfect—the rustic look adds to its charm!
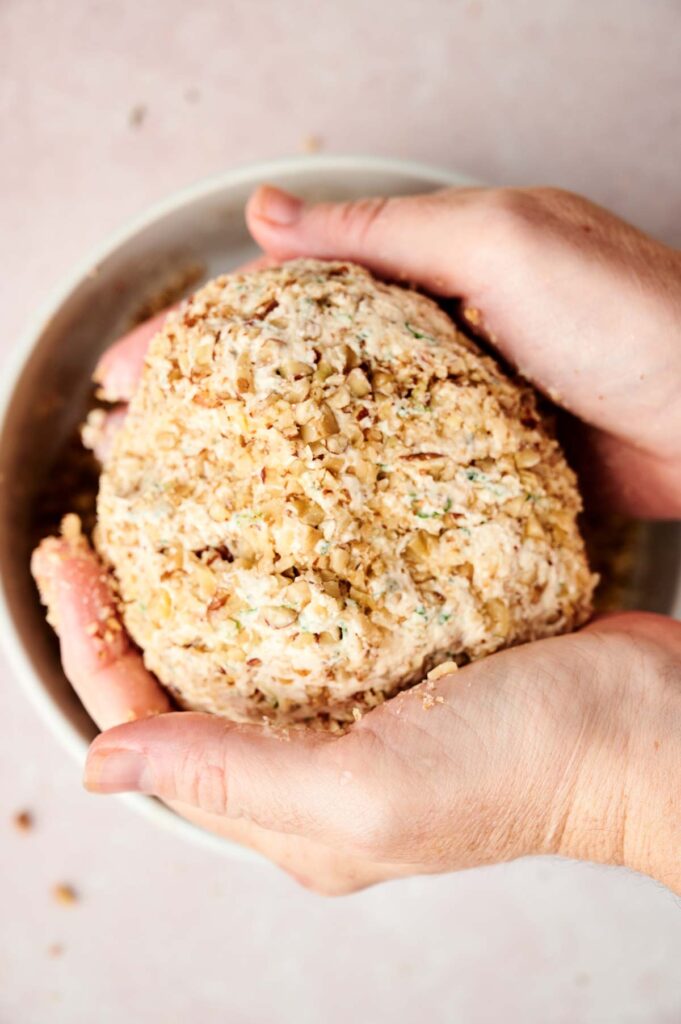
Coat with Nuts
Spread the chopped pecans and walnuts on a plate. Hold the cheese ball in one hand and gently press the nuts onto its surface with the other.
Roll the ball around to get an even coating of crunchy goodness on every side.
Chill and Serve
Wrap the cheese ball tightly in plastic wrap and place it in the fridge for at least an hour to firm up.
When you’re ready to serve, let it sit at room temperature for 15–20 minutes so it softens just enough for easy spreading or slicing.

Best Cheese Ball Recipe with Nuts
Ingredients
- ⅓ cup pecans roughly chopped
- ⅓ cup walnuts roughly chopped
- 16 ounces cream cheese softened
- 2 cups sharp Cheddar cheese freshly grated
- 1 teaspoon Worcestershire sauce
- 2 green onions chopped
- 1 teaspoon hot pepper sauce
- ½ teaspoon garlic powder
- 1 teaspoon dried parsley
- ½ teaspoon dried oregano
- ¼ teaspoon black pepper ground
Instructions
- Place the chopped pecans and walnuts on a plate and set them aside.⅓ cup pecans, ⅓ cup walnuts
- In a medium-sized bowl, mix the softened cream cheese until smooth. Add the grated cheddar cheese, Worcestershire sauce, chopped green onions, hot sauce, garlic powder, dried parsley, oregano, and black pepper. Stir until everything is fully combined.16 ounces cream cheese, 2 cups sharp Cheddar cheese, 1 teaspoon Worcestershire sauce, 2 green onions, 1 teaspoon hot pepper sauce, ½ teaspoon garlic powder, 1 teaspoon dried parsley, ½ teaspoon dried oregano, ¼ teaspoon black pepper
- Using a spatula, scrape the mixture into the center of the bowl. Lightly grease your hands and shape the mixture into a ball.
- Hold the cheese ball in one hand and use your other hand to press the chopped nuts onto the surface. Rotate the ball to ensure the nuts evenly coat all sides.
- Wrap the cheese ball tightly in plastic wrap and refrigerate for about an hour to firm it up. Remove it from the fridge 15–20 minutes before serving to let it soften slightly. Serve with crackers, vegetables, or your favorite dippers.
Notes
- Use Room-Temperature Cream Cheese: This makes mixing easier and ensures a smooth, creamy base.
- Grate Your Own Cheese: Freshly grated cheddar melts into the mixture better than pre-shredded, which can be coated in anti-caking agents.
- Adjust the Heat: Prefer a bit of spice? Add more hot sauce! Keeping it mild? You can leave it out altogether.
- Nut-Free Option: If nuts aren’t your thing, swap them for crushed pretzels or crispy bacon bits for a delicious alternative.
- Chill Time is Crucial: The flavors meld together beautifully while the cheese ball firms up in the fridge.
- Prep Ahead: This cheese ball can be made a day in advance, making it a stress-free choice for entertaining.
- Flavor Swaps: Experiment with different herbs or cheeses—try smoked cheddar or fresh dill for a twist.
- Serve it Small: For parties, divide the mixture into mini cheese balls for individual servings.
Nutrition
Recipe Notes and Expert Tips
Here are a few simple tricks to make this cheese ball the star of your table:
- Use Room-Temperature Cream Cheese: This makes mixing easier and ensures a smooth, creamy base.
- Grate Your Own Cheese: Freshly grated cheddar melts into the mixture better than pre-shredded, which can be coated in anti-caking agents.
- Adjust the Heat: Prefer a bit of spice? Add more hot sauce! Keeping it mild? You can leave it out altogether.
- Nut-Free Option: If nuts aren’t your thing, swap them for crushed pretzels or crispy bacon bits for a delicious alternative.
- Chill Time is Crucial: The flavors meld together beautifully while the cheese ball firms up in the fridge.
- Prep Ahead: This cheese ball can be made a day in advance, making it a stress-free choice for entertaining.
- Flavor Swaps: Experiment with different herbs or cheeses—try smoked cheddar or fresh dill for a twist.
- Serve it Small: For parties, divide the mixture into mini cheese balls for individual servings.
How to Store Leftover Cheese Ball
If you have leftovers, don’t worry—they store beautifully and are just as delicious the next day! Wrap the remaining cheese ball tightly in plastic wrap or place it in an airtight container to keep it fresh. You can store it in the fridge for up to five days.
For longer storage, you can freeze the cheese ball. Wrap it tightly in plastic wrap, then place it in a freezer-safe bag or container. It will keep well in the freezer for up to one month.
When you’re ready to enjoy it again, transfer it to the refrigerator to thaw overnight. Let it sit at room temperature for about 20 minutes before serving to regain its creamy texture.
Just note that the nut coating might lose a bit of its crunch after freezing, so you can roll it in a fresh batch of nuts after thawing if desired. It’s a great make-ahead option for busy weeks or last-minute entertaining!
What to Serve with a Cheeseball
A cheese ball is incredibly versatile and pairs well with a variety of options, making it a centerpiece for any appetizer spread.
Serve it with classic choices like buttery crackers, crispy breadsticks, or toasted baguette slices. For a healthier twist, pair it with fresh veggies such as carrot sticks, celery, cucumber rounds, or bell pepper strips.
Looking to mix things up? Try serving it with pretzels for a salty crunch or apple slices for a hint of sweetness that complements the creamy cheese and nut coating perfectly.
Want to make an even bigger impression? Place the cheese ball on a charcuterie board surrounded by cured meats, olives, dried fruits, and nuts for a stunning display that’s as delicious as it looks.
This cheese ball also works beautifully as a spread for sandwiches or bagels, making it a versatile option long after the party’s over. Whether you’re serving it at a holiday gathering, game day, or a casual get-together, there’s no wrong way to enjoy it!
More Easy Appetizer Recipes For You To Try
- Quick Buffalo Chicken Dip
- Easy Turkey Sliders
- Egg Drop Soup
- Deviled Eggs
- Philly Cheesesteak Sliders
Did you make this recipe? We’d love to know! Please leave a 5-star review below (it really helps!) and tag and follow us on Pinterest, Facebook, and Instagram, for more tasty inspiration!